Back in November 2019 I decided I wanted to start a food blog. But I had one big problem....I had NO IDEA where to start. I have absolutely no background or experience in blogging or technology. So after making a ton of mistakes in my first 6 months as a blogger (and then spending months fixing those mistakes). I decided to put together a list of everything I wish I had known when I started.
So first of all, if you have the money....just pay someone to develop your site for you. It's worth it. However, if you're googling "how to start a food blog" you're probably like me and want to save money and do it yourself. So you came to the right place!
I had no idea what an involved process it really is and I quickly got overwhelmed. So I hope this post provides you with a solid outline to follow as you get started on your food blog adventure!
Quick disclaimer before we dive in, one of the ways I monetize my blog is through affiliate links. Which means if you purchase a product through one of the links on this page, I may earn a small commission (at absolutely no cost to you). But we'll talk even more about how to monetize your food blog farther down in the post!
So here's a quick outline of what we're going to cover in this post! You can click on anything in this list to jump directly to that topic!
Jump to:
- 1. Find your niche
- 2. Pick out a unique blog name and buy the domain
- 3. Choose a reliable web host
- 4. Establish your blogging platform
- 5. Choose a theme for your food blog
- 6. Define your brand
- 7. Install key plugins
- 8. Invest in yourself
- 9. Launch your food blog!
- 10. Ways to monetize your food blog
- Happy Blogging!!
- More food blogging resources
- Comments
1. Find your niche
One of the most important parts of starting a blog (that I did not know at first), is defining your niche. Choosing a specific niche is the best way for you to be able to gain traction and stand out in a saturated market. If you try to blog about every single type of food, it will be harder to find a dedicated audience if they never really know what they'll get from you.
So I knew that I wanted to focus on recipes that are made completely from scratch. Which was honestly far too broad but it was a good place to start. As my blog started to grow, I found that baked goods are always the most popular posts so I decided to focus primarily on scratch-made baked goods. I still post some savory recipes but 80% of my content is desserts.
That's not to say you have to choose between sweet or savory. It could be "easy weeknight meals" or "how to eat healthy on a college student budget." You could focus on vegan recipes or gluten-free recipes. The options are honestly endless so choose something that you love and are passionate about within the vast food world. And if you really don't know what to choose, there's no harm in starting out doing everything and then narrowing your focus based on what your audience responds to.
You can use a keyword research platform like Keysearch to help find topics and recipes people are looking for!
2. Pick out a unique blog name and buy the domain
In my opinion, this is the most stressful part of the entire process. Choosing your blog name is HUGE. No pressure...but you want to choose a name that you love and plan to stick with. Because changing your name later on is a massive hassle. So honestly just take your time with this step.
I highly recommend making your blog name personal. It will help you stand out and connect with your audience. You also want a name that's relatively short, clean, and easy to say/spell.
So since my last name is Sage, I knew I wanted that to be part of my blog name. So I spent hours trying to come up with names that involved Sage. I thought about ingredients that I love (like garlic or chocolate), kitchen appliances, places I've lived, you name it! I had a ridiculous scratch pad of terrible names. Then one day I looked down at my sweet pup and it clicked. Her name is Barley and I realized that Barley & Sage would be an adorable and meaningful blog name.
Buy the domain name!
Now that you have an idea of your blog name, you’ll need to check that it’s actually available. Use a domain name checker to make sure your wanted domain name is actually available for you to use. The more individual your domain name is, the more likely it will be available.
An example of a domain checker is: www.name.com
If it’s available then buy it straight away so that it doesn’t get snapped up by someone else! Either buy the domain name on its own or in conjunction with a web host (we’ll come to this next). I bought mine on its own through Google Domains because I didn't know the next steps yet. However, many hosting sites offers a free domain name when you sign up with them! Which of course I didn't know until after I paid for mine (lol).
IMPORTANT: Also be sure to snatch up the social media handles for that domain name! If you're wanting to create brand for yourself, it's super important to keep this streamlined across platforms. So I'm @barleyandsage on Instagram, Facebook, Pinterest, and Twitter. I don't even use twitter but I created an account under that handle so that I would own it.
If you eventually want to work with brands, nothing looks more unprofessional than sending a DM from a handle like @barley_and_$age008__x
3. Choose a reliable web host
So what's a web host? Basically, it's a service that allows you to host your website on their server and it stores all your files. Aka it's how your food blog will exist on the internet.
There are a ton of different web hosts out there that you can research, but I can only tell you about what I've used!
For the beginner
When I started my blog, I used Bluehost and they were great! I recommend starting with a very basic package from Bluehost and then changing hosts once your blog grows. Bluehost starts at just $3.95 a month and they have 24/7 customer support!
Once your blog grows
After about a year, my blog has grown substantially! After I started getting around 40,000 pageviews per month my site started to get a little too slow while I was on Bluehost. So I recently switched to Big Scoots and they've been amazing! They migrated my site over for free and the customer service has been phenomenal! I'm currently doing fully managed hosting with Big Scoots for $35 a month.
4. Establish your blogging platform
This is the software that you use to manage the content, upload your images, write posts, and customize the look of your blog.
The most popular platform for food bloggers is WordPress.org (not to be confused with WordPress.com). It’s the number #1 blogging platform in the world and used by major businesses like Adobe, Microsoft and The NY Times Blog. It’s interactive, fairly easy to use, completely customizable, and most importantly it’s free.
FYI, I've heard many horror stories about bloggers who started their site on Squarespace or Wix because it was easier. But as their blog grew they realized they needed to migrate over to WordPress and what a huge headache and time suck it was. So do yourself a favor and just choose WordPress.
5. Choose a theme for your food blog
This next step is one of the most fun! You get to choose what your blog will look like when your audience lands on your website! You have two options for choosing a blog theme:
Choose a free theme
There are thousands of free themes out there that have been created by WordPress or other web developers. Most of them are great and super easy to use because they're aimed a the beginner blogger. However, they are often very limited in their look and functionality and not ideal for food bloggers.
I started out with a free theme, but after about a week I was so annoyed by the limited customization that I decided to upgrade. I learned the hard way (multiple times) that trying to be cheap up front, will just cost you more time and money in the long run.
Pay for a premium WordPress theme
I would highly recommend this. If you’re serious about food blogging, a professional and fully customized site is super important! Premium themes are designed by experts, have more functionality, ongoing support, and updates. On top of that you have more ability to customize the theme and make your site look totally unique.
I HIGHLY recommend using the Feast Themes and Plug-in for your food blog! Feast is the best of the best and they have multiple themes you can choose from! They also have unmatched customer support and are constantly updating their products to stay in line with current Google best practices.
What theme do I use on Barley & Sage?
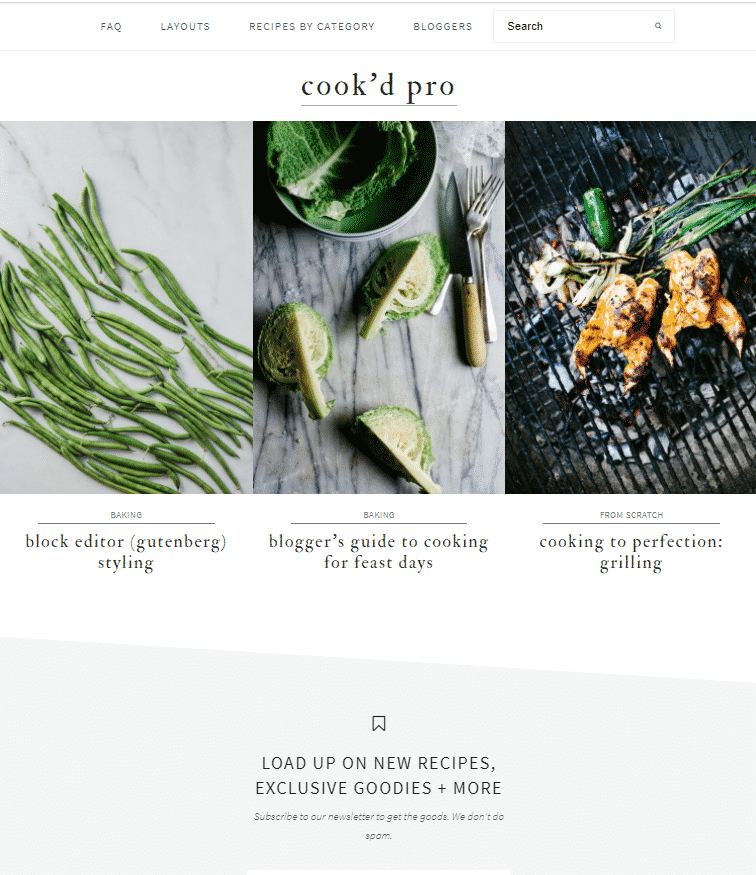
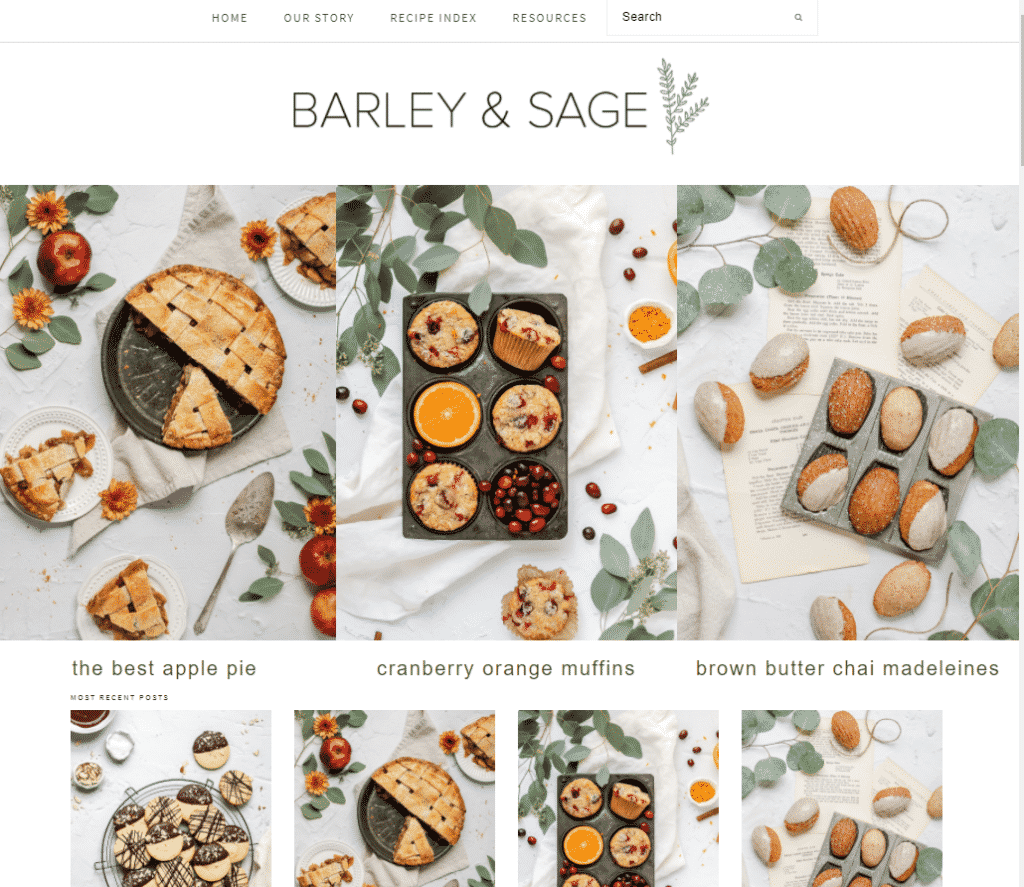
I use the Cook'd Pro theme and I've been loving it! It's super customizable, beautiful, and loads super quickly!

Below I have a screenshot of my homepage and the Cook'd Pro default homepage. You can see the similarities, but you can also see how much I've customized it to fit my brand.
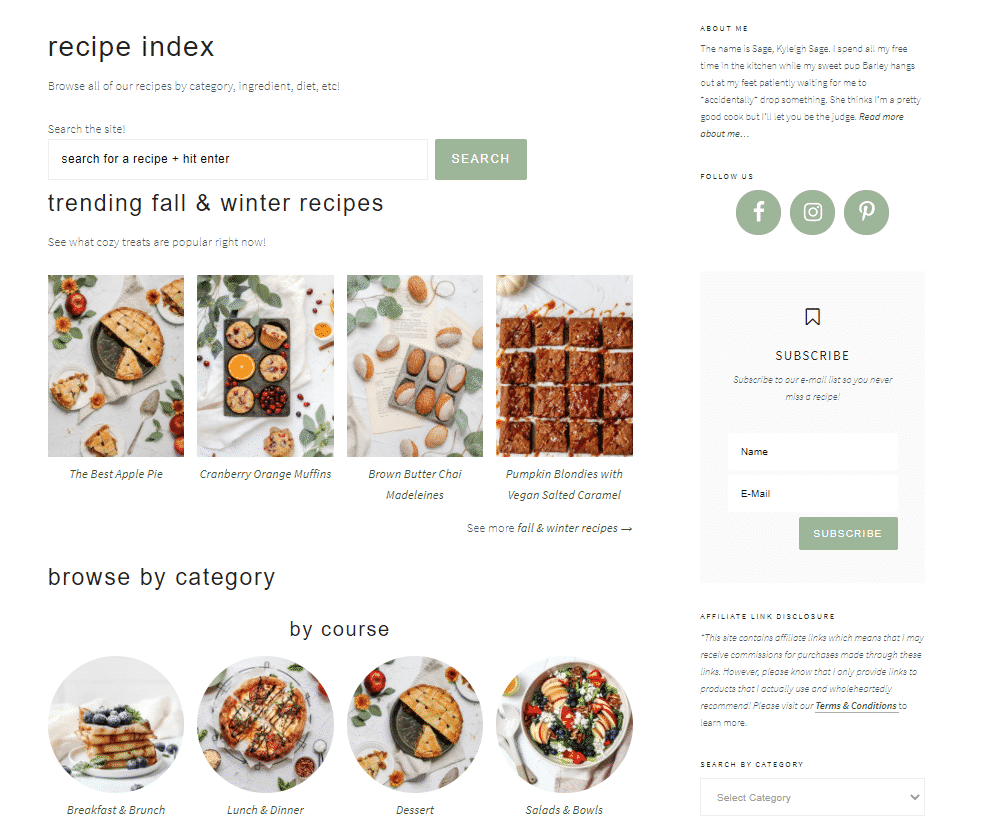
One of my favorite things about the Cook'd Pro theme is my recipe index! I have all my recipes organized by category so it's super easy to navigate!
6. Define your brand
Something super important that goes into designing your website, is having a clear brand vision. I completely lacked this when I got started and I've since had to go through and update my entire blog/logo/design.
A book that was super helpful for me and I highly recommend is How To Style Your Brand. It helps you go through all the steps involved in really solidifying your brand colors, fonts, and logo!
Choose your brand color palette
I chose a base color that I absolutely love. Given that my blog is Barley & Sage, I knew I wanted to use a shade of sage green as my main color. From there I used Paletton.com to create a complimentary color palette around that base color.
How To Style Your Brand also really dives into color theory and what different colors communicate to your audience which is something important to keep in mind!
Choose your fonts
Another thing I learned the hard way is that with fonts, simpler is better!! Stay away from anything with a ton of script or too much artistic flair.
You want to stick with fonts that are clean, simple, and easy to read! I dare say boring....but like, in a good way.
Design your logo
If you want a truly unique and customized logo, you can either create it yourself or hire someone to create one for you.
If you go the design it yourself route, How To Style Your Brand has some awesome tips for making your own logo!
Sign up for Canva!
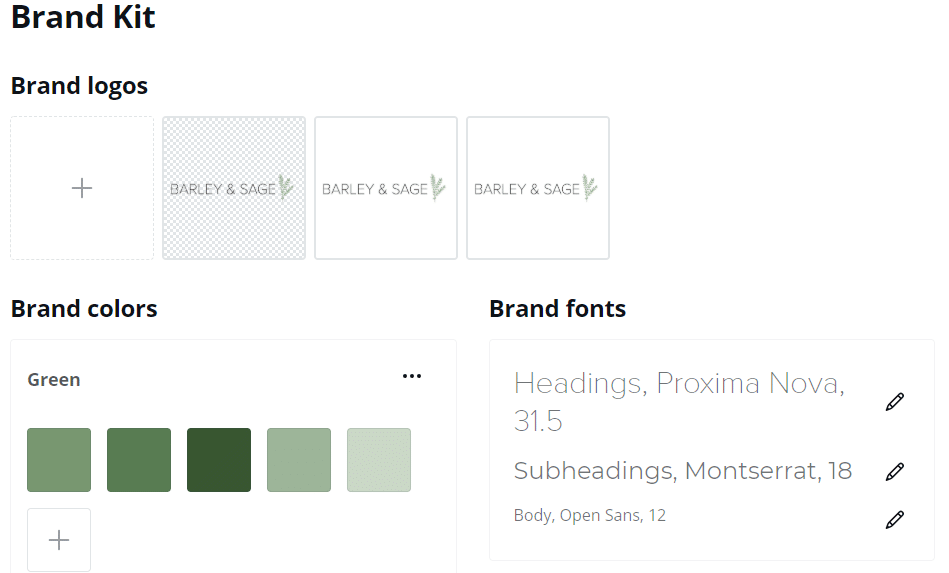
Canva is an awesome, user friendly website that helps you design logos, media kits, pins for Pinterest, and more! I just recently upgraded to the paid version, but the free version is great too! One thing I love about Canva is the ability to pre-load my brand colors and fonts so that it's super easy to create new designs that match my brand perfectly.
Below is a screenshot of my brand kit page from Canva. I was able to upload my logo, my color palette, and my custom fonts!
7. Install key plugins
So what is a plugin exactly? Basically, it’s a piece of software that will help your website in terms of functionality but also to add new features to your website. One of the reasons Wordpress is so popular is the number of plugins that are available.
There are literally hundreds of plugins out there for you to choose from. Some are free, some have a small price tag, and some have a large price tag. This is another area where one size does not fit all. You get to add as many you like and each website will be unique because if it.
So what plugins do I need??
These are some of the key plugins I have on my site that work well for me
Akismet Anti-Spam: This provides a block against spam comments. You will be amazed at the number of spam comments that get left on your blog if you don't have a plugin like this! It works super well at blocking all that unwanted spam and it's free!
Google Site Kit: It's your one stop shop for all things Google! I use both Google Analytics and Google Adsense on my blog and this is a great WordPress dashboard for tracking everything.
WP Recipe Maker: This is hands down my favorite plugin! This allows you to format your recipes into a beautiful, printer-friendly recipe card. It optimizes your recipes for SEO and allows you to add nutritional information too. WP Recipe Maker is literally one of the easiest way to publish a recipe on your blog plus it shows the recipe image on google search. Best of all, it's customizable! I easily edited the code to make my recipe card match my brand colors. I use the premium version on my website and it's SO worth it!
Word Fence Security: This is a security plugin that protects WordPress sites from unwanted intrusion and all those pesky hackers trying to infiltrate your site.
WP Optimize: A plugin that cleans your website of unnecessary stored data and compresses images in order to increase site speed. It enables a fast, lean and efficient site.
WP Rocket: This boosts the performance of your site with decreased load times and overall performance. A win-win for your site.
Yoast SEO: A super important plugin for food bloggers when you start a food blog. This plugin helps with SEO, end of story. It helps guide you on what to include in your blog post (think title, meta description ) in order to improve your rankings on google. Overall, it improves the SEO of your site so that it ranks higher in Google search!
I have more than just those plugins on my blog, but I would use the ones above as a good starting place!
8. Invest in yourself
This was the hardest thing for me to come to terms with. Spending money when you're not sure if you'll see a return on your investment is SCARY! But it's also necessary for growth.
Now investing in yourself looks different depending on what your goals are. When I started my food blog, I knew I wanted to eventually make money from it. So in that case, investing in yourself early is super important!
However, if your food blog is just going to be a hobby and you don't have any plans to monetize, you might not want to make any big investments and that's okay!
The biggest and most worthwhile investment I made in myself was Foodtography School. My first few blog posts had absolutely horrible and unappetizing food photos but I had no idea how to improve my food photography on my own. So I discovered Foodtography School and it was a total game changer for me! It's an online course that teaches the basics of food styling and composition, lighting, editing in Adobe Lightroom, and the business side of food photography. [Update as of June 2024, unfortunately this specific course is no longer available.]
The photo on the left is one of the first photos I took for my food blog and the photo on the right is much more recent (about 6 months after taking Foodtography School).


Another course I love is Artificial Light Academy! It teaches you everything you need to know about how to photograph food with artificial lighting equipment. I don't necessarily recommend this to beginners, but if you live somewhere with bad natural light or you can't photography during the day, this course is a lifesaver!
9. Launch your food blog!
You're ready to take the leap and launch your food blog! Woo hoo! Creating a fully functioning website is no small feat! But this is just the beginning of your journey as a food blogger!
10. Ways to monetize your food blog
There are a few main ways that you can begin to monetize your food blog.
Running ads on your site
Pretty much every website runs ads. It's super easy passive income which is why it's so popular. However, there is a misconception about the amount of money you make from ads. The answer? Not much, unless you're getting a substantial number of page views a month. It's still worth doing, but don't expect much of a payout in the beginning.
I recommend waiting to run ads until you can qualify for an ad service like Mediavine! My first month on Mediavine, I made just over $1000 and it's increased every month since!
Use affiliate links
Affiliate links are when you link to a product and then if a reader purchases that product via your link, you get a small commission (at absolutely no additional cost to the reader). Affiliate links are another good source of passive income, but once again the payout isn't huge. However, it's super easy to sprinkle them throughout posts (like this one) so you might as well!
I personally love affiliate links because if I'm already going to recommend a product that I love, why not get a small kickback? However, I am very purposeful about only promoting products that I actually use and wholeheartedly recommend. Sure, you can fill a post with a bunch of random links but that's not a very good way to foster a relationship with your audience. So I find it's better to use only a few affiliate links but have your readers know that they can trust your recommendations!
The two most popular hosts for affiliate links are Amazon, Reward Style, and Share A Sale.

Sponsored blog posts
This is when a food blogger partners with a brand to develop a recipe and write a sponsored blog/Instagram post. This can also include an affiliate link or a sponsored giveaway with that brand.
This is my favorite and also the biggest payout. However, you do have to really build up your social channels and be putting out high quality content before you can make big bucks from sponsored content.
Sell a digital product
This is another super popular way to monetize your food blog! Popular products are downloadable guides, recipe ebooks, Lightroom presets, etc. I don't currently have any digital products but I am working on a fun ebook that will be coming out soon!
Happy Blogging!!
I hope you found everything in this post helpful! Like I said earlier, I am by no means an expert but this is everything I wish I had known when I got started! If you ever have any questions or just want to chat, you can leave a comment on this post, email me at kyleigh@barleyandsage.com, or send me a DM on Instagram!
More food blogging resources
Browse more resources →



Comments
No Comments