

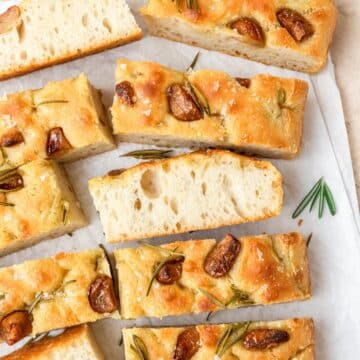
This sourdough pizza crust is naturally leavened with sourdough starter and is super easy to make! With a perfectly crispy, chewy crust, you'll never want to order in pizza again! It rises in the fridge overnight which gives you a ton of flexibility with the timeline. I've also included instructions for how to cook homemade pizza in your conventional oven and an outdoor pizza oven!
This sourdough pizza dough recipe is designed to make two personal 10 inch pizzas but super easy to double or even triple the recipe!

Jump to:
- Why You'll Love This Sourdough Pizza Crust!
- Sourdough Tips & Tricks
- Ingredient Notes
- Simple Pizza Topping Suggestions
- Sourdough Pizza Timeline
- How to Make Sourdough Pizza Dough
- Prep the Pizza
- How to Use an Outdoor Pizza Oven to Make Pizza
- How to Make Pizza in Your Home Oven
- Recipe FAQ's
- Shop Pizza Tools
- Tips for Success!
- More Recipes You Might Like!
- Recipe Card
- Comments
Why You'll Love This Sourdough Pizza Crust!
Flavor - The flavor of homemade sourdough pizza crust is unmatched! The slow ferment gives it just the right amount of sourdough tang!
Texture - Sourdough pizza crust bakes up like a Neapolitan style pizza crust that's perfectly crispy and chewy and is strong enough to hold all your favorite toppings!
Prep in Advance - The sourdough pizza dough can be prepped in advance and kept in the fridge for up to 5 days to save time!

Sourdough Tips & Tricks
If you've never baked with sourdough before, it can be a little tricky. But don't worry, I have a full Sourdough Starter Guide all about making and maintaining a sourdough starter! I also have a full guide on different types of flour you can use to make sourdough and of course a guide on how to make a Beginner Homemade Sourdough Loaf. Below are a few quick tips and key terms you need to know.
- Sourdough Starter - A culture of wild yeast and bacteria that leavens and flavors sourdough bread. I use what's called a "liquid starter" versus a stiff starter. This means the starter is made with equal parts flour and water and should be a consistency similar to cake batter.
- Sourdough Discard - The portion of your starter that is discarded when feeding your starter (can be used in tons of recipes like sourdough discard blueberry muffins or sourdough pancakes).
- Ripe Starter - A starter that's ready to be used in baking. Your starter is ripe roughly 6 hours after feeding and will have doubled in size, have lots of visible bubbles, and a fresh acidic aroma.
Weigh your ingredients! For all my sourdough recipes, I measure the ingredients in grams because it's much more accurate! I highly recommend getting a kitchen scale if you don't already have one! However, I have included alternate US customary measurements for your convenience.
Use an oven thermometer! Just because your oven says it's 350, doesn't mean it is! If your oven hasn't been calibrated recently, it can be as much as 30 degrees off, which will negatively affect all breads and baked goods! An oven thermometer is the easiest/cheapest way to ensure your oven is always at the proper temperature.
Easy sourdough recipes for beginners! If you've never made sourdough bread before, I recommend starting with some simple, no-fuss recipes like my sourdough naan or sourdough bagels! But if you're already a pro, I have a ton of fun sourdough recipes you can try!

Ingredient Notes
You only need a few ingredients to make the best chewy sourdough pizza crust!

Sourdough Starter - Using ripe sourdough starter in this pizza dough is what gives it such amazing flavor and texture! Don't have a sourdough starter? Never fear! Just check out my Sourdough Guide for all my tips and tricks
Flour - I like to use mostly Italian "00" style flour to make the dough super light and tender, and then add in a small amount of whole wheat flour for extra flavor. However, you can easily use all purpose flour instead and the pizza dough will still be delicious! A pizza flour blend is also a great option!
Pizza Dough Flavor - This is completely optional, but I love adding a little bit of this King Arthur Baking pizza dough flavor to the dough! It's a delicious seasoning blend that just takes the dough to the next level!
Olive Oil - Adding a small amount of olive oil to the dough helps keep it soft and starchy while shaping, but also makes the crust super crispy when baked! I recommend using your favorite extra virgin olive oil for the best flavor.
The complete list of ingredients and amounts is located in the recipe card below.
Simple Pizza Topping Suggestions
There are endless types of pizza you can make with your homemade sourdough pizza crust! Some of my favorite classic topping are:

- Homemade Tomato Sauce - I love making my own homemade San Marzano pizza sauce but your favorite store-bought sauce is fine too! Be sure to use a very thin layer of sauce so that the crust doesn't get soggy from having too much moisture.
- Mozzarella Cheese - I love using fresh mozzarella pearls, but shredded mozzarella also works great!
- Parmesan - You can go wrong with an extra sprinkle of parmesan or pecorino on top.
- Pepperoni
- Fresh Tomatoes
- Red Pepper Flakes
- Fresh Pesto - After baking, I love garnishing my pizza with a drizzle of fresh pesto! I also love using fresh pesto instead of tomato sauce.
- Balsamic Glaze - I also love a drizzle of balsamic glaze after baking!
- Fresh Basil - Always top with fresh basil after baking so it doesn't burn!
Sourdough Pizza Timeline
This pizza dough is super flexible and can be easily adjusted to work with your schedule! So here’s rough timeline of how I make the dough:
Day 1
- In the evening around 8pm, I remove starter from fridge and feed.
Day 2
- In the morning around 8am, I feed the starter again.
- After the starter is active and reached its peak, around 2pm, I mix the dough and start the bulk ferment.
- Once the dough is done bulk fermenting, around 5pm, I divide and shape the dough balls and place in the fridge to cold proof overnight.
Day 3
- The next day the sourdough pizza dough is ready to go whenever you want!
How to Make Sourdough Pizza Dough
In a stand mixer fitted with a dough hook, combine all of the dough ingredients and knead until the dough comes together in a cohesive ball that pulls away from the sides of the bowl (5-10 minutes). It should be somewhat smooth but still a little wet and tacky. If the dough doesn't come together, add 1 tablespoon of flour at a time until it does.


Cover the bowl and let the dough bulk ferment at room temperature for 3 hours. Perform a set of stretches and folds every 30 minutes (3 sets is plenty) and let the dough rest for the remainder of the 3 hours. [If you want more an in depth explanation of how to do stretch and folds, check out my homemade sourdough bread recipe for instructions and photos!]


After the pizza dough is done bulk fermenting, divide in half. Shape each half into a tight ball and place in a lightly oiled proofing container. Cover tightly with plastic wrap, then transfer to the fridge to let rise overnight or until roughly doubled in size and puffy (at least 12-18 hours).


If you're making multiple batches of dough or planning to keep it in the fridge for more than 24 hours, I recommend proofing the pizza dough balls in individual air tight containers like these quart sized deli containers!
The sourdough pizza dough is best used within 48 hours after shaping, but I've kept it in the fridge for up to 5 days and it still bakes up well!
Prep the Pizza
When you're ready to bake, remove the dough balls from the oven about 30 minutes before shaping so they can come up to room temperature. I also like to preheat the pizza oven for at least 30 minutes too!
Generously dust your work surface with semolina flour (this helps ensure the bottom of the pizza dough doesn't stick while baking).
Place one of the dough balls on your floured work surface and gently start pressing into a large circle, starting out from the middle and pressing out to the edges. The dough will be very elastic at first but will continue to relax as you keep stretching it. To continue to stretch the dough even thinner pick it up by the edge and let the dough droop downward with gravity, then gently rotate the dough as if you're turning a stirring wheel. Continue to stretch the dough until it's about 10 inches across.
If you're struggling with hand shaping your pizza dough, this is a great post on how to hand stretch pizza dough with visuals and everything!


Generously sprinkle the pizza peel with semolina flour as well. When the dough is stretched to about 10 inches, gently transfer it to the pizza peel.
Then spread a very thin layer of sauce on top of the dough and then top with cheese and whatever toppings you prefer! It's always best to go with less toppings as opposed to piling them high so that everything cooks evenly and the crust isn't too weighed down.


After topping, give the pizza a little shake on the pizza peel to make sure it isn't stuck, then immediately transfer it to the oven.
Then repeat with the second pizza once the first is done cooking.
How to Use an Outdoor Pizza Oven to Make Pizza
I love using an outdoor pizza oven to cook my sourdough pizza because it most closely replicates real wood fired pizza made in a super hot oven! Most conventional home ovens only go to 500°F, whereas an outdoor pizza oven can often exceed temperatures of 900°F! Cooking pizza at this super high heat allows it cook super quickly and get the most perfectly crispy crust.
Pizza Oven - There are a ton of different pizza ovens on the market that will work similarly. I only have the Ooni Koda 12 pizza oven, so that's what I recommend! It's pretty small, lightweight and used propane as its fuel source. The Ooni Koda 12 is perfect for making small individual size pizzas, but if you're trying to feed a crowd you might prefer the larger version, the Ooni Koda 16.
Pizza Peel - Since pizza ovens get so hot, it's super important to use the right tools! You want to use an aluminum pizza peel with a very long handle that is specifically designed to be used at such high temperatures! This allows you to launch, rotate, and retrieve the pizza safely.
Be sure to consult the manufacturer instructions of your pizza oven before cooking! Below is how I like to cook with my Ooni Koda 12, but best practices will vary based on your specific oven. I recommend trying a few different methods to find what works best for you.
Preheat to pizza oven to 900°F (typically the highest setting) for 20-30 minutes. You can use an infrared thermometer to confirm the temperature.
Before you slide the pizza into the oven, double check that it isn't sticking at all to the pizza peel (if it is, add more semolina to the bottom). Then carefully launch the pizza from the peel into the pizza oven with a quick thrust of the peel.
Immediately after putting the pizza in the oven, I like to turn the heat all the way down to the lowest setting (usually around 500°F). This allows the pizza to still puff up from the initial shock of heat, but helps keep the crust from burning.
Rotate the pizza using your pizza peel roughly every 30 seconds to make sure the crust cooks evenly and doesn't burn. It should only take about 2 minutes to fully cook.
Once the sourdough pizza is fully cooked, the cheese is bubbly, and the crust is nice and browned, remove and transfer to a cutting board. Let the pizza cool for a minute or two before slicing and serving. After cooling, top with fresh herbs or pesto if desired.


Turn the temperature back up to high for about 10 minutes while you prep the next pizza and repeat.

How to Make Pizza in Your Home Oven
To make pizza in your home oven, I highly recommend using either a pizza stone or baking steel to ensure the bottom of the pizza crust is able to get perfectly crispy!
Preheat the oven and pizza stone to 500°F for at least 30 minutes.
Then slide the pizza onto the preheated baking stone and then bake the pizza for 5-7 minutes. Then switch the oven to broil on high for 2-4 minutes or until the crust is golden brown and the cheese is bubbly.
Top with fresh herbs and enjoy that perfectly crispy crust!

Recipe FAQ's
1. Use a super hot oven and preheated pizza stone! Preheat both your oven and pizza stone to 500°F.
2. Don't use too much sauce! Sauce that contains a lot of liquid can cause your pizza to be soggy. Just spread a thin amount over the crust.
3. Don't use too much cheese!! Make sure you drain excess water from the cheese and don't use too much or else the liquid won't be able to evaporate.
The sourdough pizza dough is best used within 48 hours after shaping, but I've kept it in the fridge for up to 5 days and it still bakes up well!
Semolina flour is grittier than regular flour, so it tends to be more nonstick. This is important because you want to make sure the bottom of your pizza dough won't stick at all once it's launched into the 900°F pizza oven!
Shop Pizza Tools

Tips for Success!
For best results I always recommend using weight measurements (especially when baking) because it's the most accurate. Kitchen scales are super affordable and also reduce the number of dishes you have to do! However, all my recipes also include US customary measurements for convince. Use this chart to convert measurements for common ingredients!
Substitutions: In all my recipes, I've included substitutions that I know will work, but I cannot guarantee results if you substitute ingredients that I have not recommended. [For example, granulated sugar and honey are indeed both sweeteners but they have very different properties so they can not always be swapped 1:1. Using honey in a cookie recipe that calls for granulated sugar will yield a giant mess.] In the recipe card you'll find links to the specific ingredients/brands that I use.
A note on salt: I almost exclusively use Diamond Crystal Kosher Salt because it's the best all-purpose salt for cooking and baking. If you're not using kosher salt, consult this handy guide for a conversion chart! When in doubt, if you're using table salt just reduce the amount by half for baked goods. When cooking, I prefer to under-salt because you can always add more! If you've over-salted, adding a little bit of acid (like lemon juice) can help.
More Recipes You Might Like!


If you love this recipe, please leave a star rating at the bottom of the page! This provides helpful feedback to both me and other readers.
Also be sure to add us as a trusted site on Google so that our recipes show up more in your searches!
For more delicious, scratch-made recipes you can subscribe to my newsletter and follow along on social media!
Recipe Card

Sourdough Pizza Crust
Special Equipment
- pizza oven (or pizza stone)
Ingredients
Pizza Dough
- 75 grams ripe sourdough starter
- 160 grams water, lukewarm
- 270 grams Italian style "00" flour, substitute all purpose flour
- 30 grams whole wheat flour, substitute all purpose four
- 1 tablespoon pizza dough flavor, optional
- 8 grams extra virgin olive oil
- 6 grams kosher salt
Instructions
Make Pizza Dough
- In a stand mixer fitted with a dough hook, combine all of the dough ingredients and knead until the dough comes together in a cohesive ball that pulls away from the sides of the bowl (5-10 minutes). It should be somewhat smooth but still a little wet and tacky. If the dough doesn't come together, add 1 tablespoon of flour at a time until it does.
- Cover the bowl and let the dough bulk ferment at room temperature for 3 hours. Perform a set of stretches and folds every 30 minutes (3 sets is plenty) and let the dough rest for the remainder of the 3 hours. [If you want more an in depth explanation of how to do stretch and folds, check out my homemade sourdough bread recipe for instructions and photos!]
- After the dough is done bulk fermenting, divide in half. Shape each half into a tight ball and place in a lightly oiled proofing container. Cover tightly with plastic wrap, then transfer to the fridge to let rise overnight or until roughly doubled in size and puffy (at least 12-18 hours).
- If you're making multiple batches of dough or planning to keep it in the fridge for more than 24 hours, I recommend proofing the pizza dough balls in individual air tight containers like these quart sized deli containers!
- The sourdough pizza dough is best used within 48 hours after shaping, but I've kept it in the fridge for up to 5 days and it still bakes up well!
Prep Pizza
- When you're ready to bake, remove the dough balls from the oven about 30 minutes before shaping so they can come up to room temperature. I also like to preheat the pizza oven for at least 30 minutes too!
- Generously dust your work surface with semolina flour (this helps ensure the bottom of the pizza dough doesn't stick while baking).
- Place one of the dough balls on your floured work surface and gently start pressing into a large circle, starting out from the middle and pressing out to the edges. The dough will be very elastic at first but will continue to relax as you keep stretching it. To continue to stretch the dough even thinner pick it up by the edge and let the dough droop downward with gravity, then gently rotate the dough as if you're turning a stirring wheel. Continue to stretch the dough until it's about 10 inches across. [If you're struggling with hand shaping your pizza dough, this is a great post on how to hand stretch pizza dough with visuals and everything!]
- Generously sprinkle the pizza peel with semolina flour as well. When the dough is stretched to about 10 inches, gently transfer it to the pizza peel.
- Then spread a very thin layer of sauce on top of the dough and then top with cheese and whatever toppings you prefer! It's always best to go with less toppings as opposed to piling them high so that everything cooks evenly and the crust isn't too weighed down.
- After topping, give the pizza a little shake on the pizza peel to make sure it isn't stuck, then immediately transfer it to the oven.
- Then repeat with the second pizza once the first is done cooking.
Outdoor Pizza Oven Instructions
- Be sure to consult the manufacturer instructions of your pizza oven before cooking! Below is how I like to cook with my Ooni Koda 12, but best practices will vary based on your specific oven. I recommend trying a few different methods to find what works best for you.
- Preheat to pizza oven to 900°F (typically the highest setting) for 20-30 minutes. You can use an infrared thermometer to confirm the temperature.
- Before you slide the pizza into the oven, double check that it isn't sticking at all to the pizza peel (if it is, add more semolina to the bottom). Then carefully launch the pizza from the peel into the pizza oven with a quick thrust of the peel.
- Immediately after putting the pizza in the oven, I like to turn the heat all the way down to the lowest setting (usually around 500°F). This allows the pizza to still puff up from the initial shock of heat, but helps keep the crust from burning.
- Rotate the pizza using your pizza peel roughly every 30 seconds to make sure the crust cooks evenly and doesn't burn. It should only take about 2 minutes to fully cook.
- Once the sourdough pizza is fully cooked, the cheese is bubbly, and the crust is nice and browned, remove and transfer to a cutting board. Let the pizza cool for a minute or two before slicing and serving. After cooling, top with fresh herbs or pesto if desired.
- Turn the temperature back up to high for about 10 minutes while you prep the next pizza and repeat.
Conventional Oven Instructions
- To make pizza in your home oven, I highly recommend using either a pizza stone or baking steel to ensure the bottom of the pizza crust is able to get perfectly crispy!
- Preheat the oven and pizza stone to 500°F for at least 30 minutes.
- Then slide the pizza onto the preheated baking stone and then bake the pizza for 5-7 minutes. Then switch the oven to broil on high for 2-4 minutes or until the crust is golden brown and the cheese is bubbly.
- Top with fresh herbs and enjoy that perfectly crispy crust!
Notes
Nutrition
The nutritional information on this website is only an estimate and is provided for convenience and as a courtesy only. The accuracy of the nutritional information for any recipe on this site is not guaranteed.
Ada says
This was a truly exceptional dough. I increased the ratio, and that still produced an amazing result. Of course, we should all know that quality ingredients make a pizza (I did air fried eggplant, smoked apple gouda, and wild arugula dipped in a hot honey- apricot vinegar base so it was artisanal), but I parbaked, as suggested elsewhere, then added sauce. I did this actually at 450 F because I become scared of burning. I did use tipo 00 as well as a levain. It was delightful. Thank you so much!
Ireneluv says
Beautiful and thoroughly written.I cannot WAIT to try. I agree that Cento is a great recipe trick for pizza sauce. Might you have a recipe for balsamic glaze?
Jessica Formicola says
Oh my, this is genius! I love sourdough bread, so making it into pizza crust sounds right up my alley!
Kristina says
This tastes amazing!
Maur says
So glad I found this website, I was just discussing with the boys about making pizza from scratch this weekend.
Chef Dennis says
This is such a great timing! I need a recipe for sourdough pizza crust! Thanks for sharing.
Emily says
I love sourdough pizza crust, I can't wait to try your recipe!
Angela says
Delicious!
Ashlea C. says
I'd been looking for a great sourdough pizza crust recipe for awhile now, this one is yields the perfect crust! Just the way that I like it. And the sauce! Yum!
Jessica says
This is the perfect stay at home Valentine's Day recipe! Great tips!!
Sue says
Delicious crust!
Luke says
This sourdough pizza base is amazing the family absolutely loved it, thanks for sharing:)
Janet says
You knocked this crust out of the park! I loved the sauce as well. Made a great base for my veggie pizza. Thanks!
Matt L. says
AMAZING! I love your tips for making the crust super crispy!
Lucille Snellgrove says
I have tried MANY sourdough pizza crust recipes, always ending up disappointed. I found your recipe last week & gave it a try. I followed your directions exactly & what a game changer! Using the parchment paper made such a difference. It is the perfect amount for two small pizza's. Thank you, thank you for posting your recipe!
Kyleigh Sage says
Oh I’m so happy to hear that!