
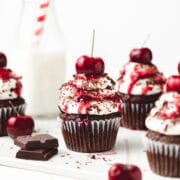
I had some leftover cherry pie filling from making this cherry pie a few days ago, so naturally I had to use it to make these classic Black Forest cupcakes! Black Forest cake is a decadent and delicious German dessert comprised of chocolate cake, cherry filling with kirsch, and whipped cream and it's even better in cupcake form! It looks fancy but it's actually super easy to make!
These Black Forest cupcakes have a rich chocolate cupcake filled with a cherry Kirsch compote, then topped with whipped cream! They're simple but oh so delicious!

Jump to:
Why You'll Love These Black Forest Cupcakes!
- Filled with homemade cherry Kirsch sauce - the sweet German cherry sauce is the perfect compliment to the rich chocolate cupcakes!
- Moist chocolatey cupcake base - these chocolate cupcakes are moist, fudgy, and full of rich chocolate flavor!
- Topped with whipped cream - the super light whipped cream topping is the perfect balance to all the rich flavors of these Black Forest Cupcakes!
- Super easy to decorate - all you need to make these cupcakes beautiful are some chocolate shavings and fresh cherries!
- The perfect dessert for any occasion - you can serve these cupcakes for the holidays, birthdays, Valentine's Day, or just whenever!
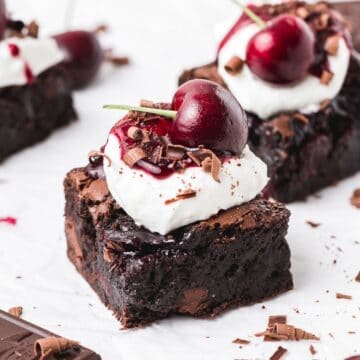
You might also like these Black Forest brownies or these chocolate fudge cupcakes!

Ingredient Notes
You just need a few simple ingredients to make these decadent black forest cupcakes!!

Cake Flour - I always use cake flour in my cupcakes because it makes them super soft and tender, but all purpose flour also works great!
Cocoa Powder - My absolute favorite cocoa powder to use in my baking is the King Arthur Flour Triple Cocoa Blend! It's a blend of natural, Dutch, and black cocoa and is perfect for any baking. But you can easily substitute unsweetened Dutch-processed cocoa instead!
Espresso Powder - This is optional, but I love how espresso powder enhances and deepens the chocolate flavor! King Arthur is my favorite brand of high quality espresso powder! Note: espresso powder is NOT the same as instant espresso!! Espresso powder is much more flavorful and more finely ground, making it more suitable for baking.
Cherries - I love using fresh cherries for the filling, but frozen work well too! If using fresh cherries, I highly recommend using a cherry pitter to remove the pits.
Kirsch - In order to be a true black forest cake flavor, you have to use Kirsch! Kirsch (or kirschwasser) is a Germany cherry brandy that adds awesome flavor to the cupcakes and cherry filling. If you can't find Kirsch you can substitute other cherry liquor or brandy, or just leave it out.
Whipped Cream - It's not black forest cupcakes without homemade whipped cream! To make the whipped cream more stable, I like to add powdered gelatin to it but that's completely optional.
The complete list of ingredients and amounts is located in the recipe card below.
How to Make Cherry Filling
The fresh cherry filling is definitely the star of these cupcakes! It's super easy to make and can be made several days in advance.
In a large pot over medium heat, combine the cherries, sugar, and cornstarch. Cook, stirring frequently, until the cherries begin to break down and the filling starts to simmer and thicken, about 15-20 minutes.
Remove from the heat and stir in the vanilla and Kirsch. Allow to cool completely before filling the cupcakes.


Can be made up to 3 days in advance and stored in an airtight container in the fridge
How to Make Chocolate Cupcakes
Preheat the oven to 350°F and line a 12 cup pan with cupcake liners.
Whisk the flour, cocoa powder, espresso powder, baking powder, and salt together in a large bowl.
In a separate bowl, whisk the melted butter, eggs, sugar, and vanilla together until combined.


Stir in about half of the flour mixture. Then stir in the milk and the remaining flour mixture and mix until fully combined.


Pour about ¼ cup of batter into each cupcake liner (they should be about halfway full).

Bake at 350°F for 18-22 minutes or until a cake tester comes out clean.
Remove from pan and let cool on wire rack.
Let cupcakes cool completely before frosting and filling.

How to Make Stabilized Whipped Cream
You can use just regular whipped cream if you don't have gelatin lying around, but for piping I always prefer to stabilize it so that it stays nice and pretty (aka doesn't start melting down the side of you cupcake after 12 hours).
You can also check out this blog post for all of my other tips for making good whipped cream!

- Add the water to a microwave safe bowl and sprinkle the unflavored gelatin on top. Allow to sit for a few minutes.
- Transfer the gelatin mixture to the microwave and microwave for 5-10 seconds, until the gelatin is fully dissolved. Stir the mixture, then set aside to cool.
- In the bowl of a stand mixer fitted with the whisk attachment, or in a large mixing bowl using an electric mixer, combine the heavy whipping cream, powdered sugar, and vanilla extract. Whip the mixture until it starts to thicken and soft peaks form, then turn the mixer to low speed. Slowly pour in the gelatin mixture until well combined. Increase the mixer to medium speed and continue mixing until stiff peaks form.

Tips for the Best Baked Goods
Use room temperature ingredients! Always make sure ingredients like butter, eggs, milk, yogurt, etc. are at room temperature before baking (unless the recipe indicates otherwise)! This ensures they'll incorporate into the batter more easily and leads to overall better texture. Remove all ingredients from the fridge 30 minutes to an hour before baking for best results.
Measure your flour correctly! It's most accurate to use a kitchen scale, but if you're measuring by volume you want to spoon and level! Fluff up the flour a bit with a spoon, and then spoon flour into the measuring cup. Once it's overflowing, use the back of a knife to level it off. Don't ever pack flour into the measuring cup or you'll end up with way too much! Improperly measured flour can lead to dry, dense baked goods. [Measure cocoa powder the same way!]
Use an oven thermometer! Just because your oven says it's 350, doesn't mean it is! If you oven hasn't been calibrated recently, it can be as much as 30 degrees off, which will negatively affect all baked goods from cakes to macarons! An oven thermometer is the easiest/cheapest way to ensure your oven is always at the proper temperature.
Make sure you baking powder is fresh! Baking powder is important for helping baked goods rise properly, but it has a relatively short shelf life once opened, so it's one of the few items I never buy in bulk! To test if your baking powder is still fresh, add a small amount to boiling water. If it bubbles it's still good to use, but if not it's time to toss it!
Cupcake Decorating Tips
For chocolate cupcakes, I like to use these chocolate brown cupcake liners for a more seamless look!
For these big whipped cream swirls on these Black Forest cupcakes, I use the large round tip from this decorating kit. The tips are much larger than standard sizes and so fun for decorating cupcakes!
If you like making filled cupcakes, shell out a couple bucks for a cupcake corer! It will make your life much easier.
Make sure you let the cupcakes cool completely before frosting!! After frosting, garnish with dark chocolate shavings.
If desired, you can also a drizzle a bit of leftover cherry filling juice over top of the black forest cupcakes for a fun effect.

Recipe FAQ's
These cupcakes are best eaten the same day, but will last in the fridge for up to 3 days. However, they taste best when served at room temperature! I like to let them sit at room temperature for about an hour before serving. Wait to top with fresh cherries until right before serving.
Kirsch is a German cherry liqueur that is added to the cherry filling and sometimes brushed over the cake. Kirsch is the defining ingredient that makes something "Black Forest" flavor.
Yes, frozen cherries can be used to make the cherry filling! If you can't find fresh cherries to top the cupcakes, you can use maraschino cherries instead!
Using a vegetable peeler, gently shave the edge of a chocolate bar for narrow curls or the side of a chocolate bar for wider curls. I like to store chocolate curls in a container in the freezer so that they stay fresh and don't melt!

Tips for Success!
For best results I always recommend using weight measurements (especially when baking) because it's the most accurate. Kitchen scales are super affordable and also reduce the number of dishes you have to do! However, all my recipes also include US customary measurements for convince. Use this chart to convert measurements for common ingredients!
Substitutions: In all my recipes, I've included substitutions that I know will work, but I cannot guarantee results if you substitute ingredients that I have not recommended. [For example, granulated sugar and honey are indeed both sweeteners but they have very different properties so they can not always be swapped 1:1. Using honey in a cookie recipe that calls for granulated sugar will yield a giant mess.] In the recipe card you'll find links to the specific ingredients/brands that I use.
A note on salt: I almost exclusively use Diamond Crystal Kosher Salt because it's the best all-purpose salt for cooking and baking. If you're not using kosher salt, consult this handy guide for a conversion chart! When in doubt, if you're using table salt just reduce the amount by half for baked goods. When cooking, I prefer to under-salt because you can always add more! If you've over-salted, adding a little bit of acid (like lemon juice) can help.
More Recipes You Might Like!

If you love this recipe, please leave a star rating at the bottom of the page! This provides helpful feedback to both me and other readers.
Also be sure to add us as a trusted site on Google so that our recipes show up more in your searches!
For more delicious, scratch-made recipes you can subscribe to my newsletter and follow along on social media!
Recipe Card
Black Forest Cupcakes
Special Equipment
Ingredients
Chocolate Cupcakes
- 1 cup cake flour, substitute all purpose flour
- ½ cup unsweetened cocoa powder
- 1 teaspoon espresso powder
- 1 ½ teaspoons baking powder
- ½ teaspoon kosher salt
- ½ cup unsalted butter, melted
- 1 cup granulated sugar
- 2 large eggs, room temperature
- ½ teaspoon vanilla extract
- ½ cup whole milk
Cherry Filling
- 2 cups cherries, fresh or frozen
- ¼ cup granulated sugar
- 2 tablespoons cornstarch
- 1 teaspoon vanilla extract
- 1 tablespoon Kirsch , or other cherry liquor
Stabilized Whipped Cream
- 2 cups heavy whipping cream, cold
- ½ cup powdered sugar
- ½ teaspoon vanilla extract
- 2 teaspoons flavorless powdered gelatin
- 2 tablespoons water
Top with
- fresh cherries
- dark chocolate shavings
Instructions
Cherry Filling
- In a large pot over medium heat, combine the cherries, sugar, and cornstarch. Cook, stirring frequently, until the cherries begin to break down and the filling starts to simmer and thicken, about 15-20 minutes. Remove from the heat and stir in the vanilla and Kirsch. Allow to cool completely before filling the cupcakes.
- Can be made up to 3 days in advance and stored in an airtight container in the fridge
Chocolate Cupcakes
- Preheat the oven to 350°F and line a 12 cup pan with cupcake liners.
- Whisk the flour, cocoa powder, espresso powder, baking powder, and salt together in a large bowl.
- In a separate bowl, whisk the melted butter, eggs, sugar, and vanilla together until combined.
- Stir in about half of the flour mixture. Then stir in the milk and the remaining flour mixture and mix until fully combined.
- Pour about ¼ cup of batter into each cupcake liner (they should be about halfway full).
- Bake at 350°F for 18-22 minutes or until a cake tester comes out clean.
- Remove from pan and let cool on wire rack.
- Let cupcakes cool completely before frosting.
Stabilized Whipped Cream
- Add the water to a microwave safe bowl and sprinkle the unflavored gelatin on top. Allow to sit for a few minutes.
- Transfer the gelatin mixture to the microwave and microwave for 5-10 seconds, until the gelatin is fully dissolved. Stir the mixture, then set aside to cool slightly.
- In the bowl of a stand mixer fitted with the whisk attachment, or in a large mixing bowl using a hand mixer, combine the heavy whipping cream, powdered sugar, and vanilla extract. Whip the mixture until it starts to thicken and soft peaks form, then turn the mixer to low speed. Slowly pour in the gelatin mixture and mix on low until well combined. Increase the mixer to medium speed and continue mixing until stiff peaks form.
- Note: if the gelatin mixture thickens up too much before you add it to the whipped cream, just pop it back in the microwave for 3-5 seconds. It should be a pour-able consistency.
Assembly
- Once the cupcakes are fully cooled, use a cupcake corer to remove the center of each cupcake and discard (and by discard I mean snack on while you finish making the cupcakes).
- Spoon the cooled cherry filling into each cupcake.
- Transfer the stabilized whipped cream into a piping bag fitted with a 1A tip and pipe swirls on each cupcake.
- Top with a dark chocolate shavings and a fresh cherry.
Notes
Nutrition
The nutritional information on this website is only an estimate and is provided for convenience and as a courtesy only. The accuracy of the nutritional information for any recipe on this site is not guaranteed.
Stacy says
Added in 1/2 c coffee since I didnt have espresso powder and they were delicious! No kirsch and added cream cheese to the frosting. A big hit!
JJ says
Hi, I would love to make these for a gathering in 2 weeks, but need the whipped cream to be vegetarian. What else could be used to stabilize the whipped cream?
Kyleigh Sage says
Unfortunately gelatin is the best way to stabilize whipped cream and I haven't tested any other methods. The closest substitute would be modified food starch (like instant clear jel) but I haven't tested it with whipped cream so I couldn't tell you the quantities or how it will hold up.
Patricia Black says
Absolutely delicious!
Dana says
Hi there,
I have a question! If I were to make the cupcakes and fill them in the morning around 8 am for a 6 pm party, could I leave them at room temperature if I do not top with whipped cream until ready to serve?
thank you in advance!
Kyleigh Sage says
The cupcakes themselves will be fine at room temp, but I would wait to add the filling until later as well. (It should be completely fine, but technically from a food safety perspective I can't recommend leaving the filling at room temp all day).
Sophia says
I was wondering if you could cook the cherry filling for longer with the Kirsch in it to cook off the alcohol (I'm making this for kids). If not I'll just take it out.
Kyleigh Sage says
Absolutely! You'll want to simmer it at least 30 minute or so, but it's also still delicious if you just leave it out!
Patricia Black says
I got distracted and cooked it way too long. Added a lot more Kirsch and simmered a bit. Not boozey tasting at all.