
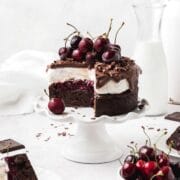
This Black Forest ice cream cake has a rich, fudgy brownie layer topped with kirsch infused cherry sauce, then a layer of vanilla ice cream. Then finished with dark chocolate ganache and fresh cherries! It's an indulgent treat that's surprisingly easy to make and assemble!
If you've never had it before, Black Forest cake is a German dessert comprised of chocolate cake, cherry filling with kirsch, and whipped cream. So I decided to adapt to it make this fun black forest ice cream cake!
At first I tested this ice cream cake with a regular chocolate cake layer but ultimately decided a brownie layer was better because brownies taste better when frozen!

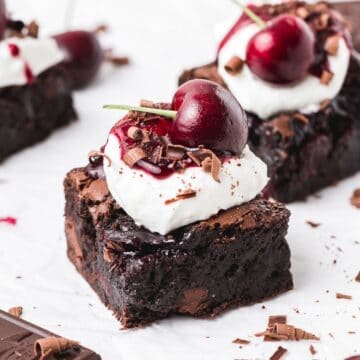
You'll also love these black forest cupcakes and these black forest brownies!
Jump to:
Ingredient Notes
You just need a few ingredients to make these black forest ice cream cake!

Cocoa Powder - My absolute favorite cocoa powder to use in my baking is the King Arthur Flour Triple Cocoa Blend! It's a blend of natural, Dutch, and black cocoa and is perfect for any baking. But this recipe will work great with whatever cocoa you have on hand! You can use either natural cocoa or Dutch processed cocoa!
Espresso Powder - This is optional, but I love how espresso powder enhances and deepens the chocolate flavor! King Arthur is my favorite brand of high quality espresso powder!
Butter - I like using melted butter for flavor, but you can also sub a neutral vegetable oil if you prefer.
Sugar - I use a combination of granulated sugar and brown sugar, but you can easily swap and use just one or the other.
Kirsch - In order to be a true black forest cake flavor, you have to use Kirsch! Kirsch (or kirschwasser) is a Germany cherry brandy that adds awesome flavor to the brownie layer and cherry sauce. If you can't find Kirsch you can substitute other cherry liquor or brandy, or just leave it out.
Vanilla Ice Cream - Traditional black forest cake uses whipped cream, so to make this an ice cream cake we're swapping the whipped cream for ice cream! Just use your favorite vanilla ice cream for the ice cream layer!
Cherries - I love using fresh cherries for the sauce, but frozen will work well too! If using fresh cherries I highly recommend using a cherry pitter to remove the pits. Garnish with fresh cherries or maraschino cherries.
Dark Chocolate - Use dark chocolate baking bars as opposed to chocolate chips!! Chips contain emulsifiers that help them keep their shape, which also means they won't melt as smoothly as chocolate bars. If desired, you can use milk chocolate instead.
The complete list of ingredients and amounts is located in the recipe card below.
How to Make Cherry Filling
Add the cherries and sugar to a large pot.
Heat over medium heat until the cherries begin to break down and get syrupy.


Dissolve the cornstarch in water, then add to the cherries and stir until the filling thickens. Then stir in the Kirsch.
Remove from the heat and let cool completely to room temperature.
How to Make Brownie Layer
Preheat the oven to 350°F and line a 6 inch round cake pan with parchment paper on the bottom and sides.
In a large bowl, whisk together the melted butter, brown sugar, and granulated sugar.
Add in the eggs one at a time and whisk each one until fully incorporated and the batter starts to get lighter in color.


Then add in the Kirsch and vanilla extract and mix until smooth.
Fold in the cocoa powder, espresso powder, flour, and salt and mix until the batter is just combined.


Pour the batter into the prepared cake pan.

Bake at 350°F for 25-35 minutes or until an inserted knife comes out mostly clean.
Remove from the oven and let fully cool in the pan.

How to Make Chocolate Ganache
Once the cake layers are fully frozen, make the ganache.
To make the ganache, add the chopped dark chocolate to a large bowl.
Then place the cream in a microwave safe bowl and microwave for 1-2 minutes or until hot to the touch but not boiling.
Pour over the chopped chocolate and let sit for about two minutes. Using a spatula, gently mix until the chocolate is fully melted and the ganache is fully combined and smooth.


Let sit for 10-15 minutes until the ganache is cool to the touch but still pourable.
Ice Cream Cake Assembly
For the ice cream layer, line a 6 inch round cake pan with plastic wrap. Add about 3 cups slightly softened vanilla ice cream to the pan and press into an even layer. Cover and let ice cream layer freeze for at least 2 hours (overnight is even better).

After both the brownie layer and cherry compote are cool, spread the cherry filling in an even layer over top of the brownie. Then freeze for 2 hours until set.

To assemble the cake, place the brownie and cherry layer on a serving plate, then top with a frozen ice cream layer.


Remove the cake from the freezer and pour the cooled ganache over the top. Use on offset spatula to gently push some of the edges to create the drip effect.
Place the cake back in the freezer for at least 30 minutes.


Then top the black forest cake with fresh cherries and chocolate shavings!

Recipe Notes
To get clean slices of this black forest ice cream cake, run a super sharp knife under hot water until the blade is warm, then wipe it dry. Then cut a single slice and repeat. It's a bit tedious to clean the knife before every cut, but you get perfect slices every time!
My favorite cake pans are the 6×2 inch Fat Daddio’s layer cake pans (these are the same pans I use for all my layer cakes). You'll need one for the brownie layer and one for the ice cream layer. The brownie layer WILL stick to the pan if you don't prepare it properly. So be sure to grease it well and line it fully with parchment paper. Cut out a round piece for the bottom and a strip to go around the sides.

Recipe FAQ's
Ice cream cake will last in the freezer for about a week! However, be sure to either store it in an airtight container, or wrap it several times in plastic wrap to prevent freezer burn.
Black Forest cake refers to chocolate cake topped with whipped cream and cherries. One of the key ingredients that makes something "Black Forest" flavor is Kirsch! Kirsch is a German cherry liqueur that is added to the cherry filling! So this black forest ice cream cake has a chocolate brownie layer, vanilla ice cream, and cherry sauce! It's a fun spin on the classic cake.
Yes, frozen cherries can be used to make the cherry sauce! But if you can't find fresh cherries to decorate the top, you can use maraschino cherries instead.
Using a vegetable peeler, shave the edge of a chocolate bar for narrow curls or the side of a chocolate bar for wider curls. Store the chocolate shavings in a container in the freezer so that they stay fresh and don't melt!

More Recipes You Might Like!

If you love this recipe, please leave a star rating at the bottom of the page! This provides helpful feedback to both me and other readers.
Also be sure to add us as a trusted site on Google so that our recipes show up more in your searches!
For more delicious, scratch-made recipes you can subscribe to my newsletter and follow along on social media!
Recipe Card
Black Forest Ice Cream Cake
Special Equipment
- plastic wrap
Ingredients
Cherry Sauce
- 1 cup cherries, fresh or frozen
- 2 tablespoons granulated sugar
- 1 tablespoon cornstarch
- 2 tablespoons water
- 1 tablespoon Kirsch
Brownie Layer
- ½ cup unsalted butter, melted
- ¾ cup light brown sugar
- ½ cup granulated sugar
- 2 large eggs, room temperature
- 2 tablespoons Kirsch
- 1 teaspoon vanilla extract
- ¾ cup unsweetened cocoa powder
- ⅓ cup all purpose flour
- ½ teaspoon espresso powder, optional
- ¼ teaspoon kosher salt
Chocolate Ganache
- 4 ounces dark chocolate, chopped
- ½ cup heavy cream
Topping
- 3 cups vanilla ice cream
- fresh cherries
- chocolate shavings
Instructions
Cherry Sauce
- Add the cherries and sugar to a large pot.
- Heat over medium heat until the cherries begin to break down and get syrupy.
- Dissolve the cornstarch in water, then add to the cherries and stir until the filling thickens. Then stir in the Kirsch.
- Remove from the heat and let cool completely to room temperature.
Brownie Layer
- Preheat the oven to 350°F and line a 6 inch round cake pan with parchment paper on the bottom and sides.
- In a large bowl, whisk together the melted butter, brown sugar, and granulated sugar.
- Add in the eggs one at a time and whisk each one until fully incorporated and the batter starts to get lighter in color.
- Then add in the Kirsch and vanilla extract and mix until smooth.
- Fold in the cocoa powder, espresso powder, flour, and salt and mix until the batter is just combined.
- Pour the batter into the prepared cake pan.
- Bake at 350°F for 25-35 minutes or until an inserted knife comes out mostly clean.
- Remove from the oven and let fully cool in the pan.
Chocolate Ganache
- Once the cake layers are fully frozen, make the ganache.
- To make the ganache, add the chopped dark chocolate to a large bowl.
- Then place the cream in a microwave safe bowl and microwave for 1-2 minutes or until hot to the touch but not boiling.
- Pour over the chopped chocolate and let sit for about two minutes. Using a spatula, gently mix until the chocolate is fully melted and the ganache is fully combined and smooth.
- Let sit for 10-15 minutes until the ganache is cool to the touch but still pourable.
Assembly
- For the ice cream layer, line a 6 inch round cake pan with plastic wrap. Add about 3 cups slightly softened vanilla ice cream to the pan and press into an even layer. Cover and let ice cream layer freeze for at least 2 hours (overnight is even better).
- After both the brownie layer and cherry compote are cool, spread the cherry filling in an even layer over top of the brownie. Then freeze for 2 hours until set.
- To assemble the cake, place the brownie and cherry layer on a serving plate, then top with a frozen ice cream layer.
- Remove the cake from the freezer and pour the cooled ganache over the top. Use on offset spatula to gently push some of the edges to create the drip effect.
- Place the cake back in the freezer for at least 30 minutes.
- Then top with fresh cherries and chocolate shavings.
Notes
Nutrition
The nutritional information on this website is only an estimate and is provided for convenience and as a courtesy only. The accuracy of the nutritional information for any recipe on this site is not guaranteed.
Jojo says
Hey Kyleigh, I'm just wondering, can I omit the Kirsch?
Kyleigh Sage says
Yes of course! It will change the flavor slightly but it's still delicious!
Jojo says
Or can I use Cherry Brandy?
Kyleigh Sage says
Yes that's a great substitute!