
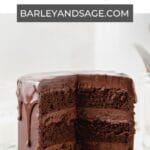
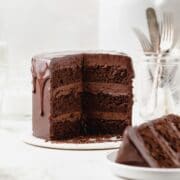
This triple chocolate layer cake is my absolute favorite chocolate cake recipe! With moist, fudgy chocolate cake layers, smothered with rich chocolate buttercream, and then covered with dark chocolate ganache, this cake is truly a chocolate lovers dream!

This triple chocolate cake is the perfect centerpiece for any birthday, Valentine's Day, or just because you're craving cake!
Jump to:
- Why You'll Love This Cake
- Ingredient Notes
- How to Make a Triple Layer Chocolate Cake
- How to Assemble a Three Layer Cake
- How to Make the Chocolate Ganache Drip
- How to Get Perfect Cake Layers
- Tips for the Best Baked Goods
- Cake Decorating Tips
- Recipe FAQ's
- Tips for Success!
- More Chocolate Recipes!
- Recipe Card
- Pin This Recipe!
- Comments
Why You'll Love This Cake
- Perfect birthday cake - If you have a chocolate lover in your life, this cake is the best way to say happy birthday!
- Better than box mix - You'll never want to buy boxed chocolate cake mix again!
- Rich chocolate buttercream - The chocolate buttercream is whipped to create a light, fluffy texture with a smooth, velvety taste!
- Super easy to make and decorate - With just a beautiful chocolate ganache drip, this cake couldn't be easier to make look stunning!
If you love chocolate as much as I do, you might also like these black forest cupcakes or this chocolate French silk pie!
Ingredient Notes
You just need a few ingredients (and a LOT of chocolate) to make the most decadent chocolate layer cake!

Vegetable Oil - I use oil instead of butter in this cake to help keep the cake super moist and delicious! You can also use canola oil or a neutral olive oil.
Cake Flour - I always use cake flour in my cakes because it makes them super soft and tender, but all purpose flour also works great!
Cocoa Powder - My absolute favorite cocoa powder to use in my baking is the King Arthur Flour Triple Cocoa Blend! It's a blend of natural, Dutch, and black cocoa and is perfect for any baking. But you can easily substitute Dutch-processed cocoa instead! If you want to use natural cocoa, see the notes below.
Espresso Powder - This is optional, but I love how espresso powder enhances and deepens the chocolate flavor! King Arthur is my favorite brand of high quality espresso powder!
Brewed Espresso - I love using coffee or espresso in the cake as it deepens the flavor of the chocolate! Hot liquid also helps bloom and dissolve the cocoa powder, so if you don't want to use coffee, use hot water instead!
Dark Chocolate - Use dark chocolate baking bars as opposed to chocolate chips!! Chips contain emulsifiers that help them keep their shape, which also means they won't combine as smoothly as chocolate bars. If desired, you can use milk chocolate instead.
Heavy Whipping Cream - This is for the ganache and cannot be substituted.
The complete list of ingredients and amounts is located in the recipe card below.
Dutch-Processed Cocoa Powder vs. Natural Cocoa Powder
Natural and Dutch-processed cocoa have different levels of acidity due to how they are processed. And as such are different in terms of whether you should use baking powder or baking soda to leaven the cake. This is a great article from King Arthur Baking that breaks everything down in more detail!
This cake calls for either Dutch-processed cocoa powder or a cocoa blend (mostly Dutch) and baking powder. So if you want to use natural cocoa powder instead, you need to adjust the leavening agent.
To use natural cocoa in this cake: Instead of 2 teaspoons of baking powder, you want to use 1 teaspoon baking powder + ½ teaspoon baking soda.
How to Make a Triple Layer Chocolate Cake
Preheat the oven to 350°F.
In a small bowl, whisk together the flour, sugar, cocoa powder, espresso powder, baking powder, and salt. Set aside.

In a separate large bowl, whisk together the vegetable oil, eggs, milk, and vanilla.
Brew the espresso or coffee right before this step so that it's very hot!
Slowly drizzle in the hot espresso while continuously whisking. [It's important to go slowly so that the eggs come up to temperature gradually and don't scramble.]

Gently mix in the dry ingredients until just combined. The batter will be thin.

Evenly spray each cake pan with an oil based pan spray (I don't recommend butter as the butter solids can cause the cake to stick to the pan).
Pour ⅓ of the batter into each cake pan (they will only be about half full).

Bake at 350°F for 25-30 minutes or until a cake tester comes out clean.
Place a cooling rack on top of each cake pan and invert. The pan should slide cleanly away.
Let the cakes cool completely to room temperature before trimming.
Once the cakes are fully cooled. Using a sharp bread knife, trim the cakes until the layers are even. Wrap each layer tightly in plastic wrap and place in the freezer overnight. Note: trimming is not always necessary! These cake layers cook up pretty evenly, so you may not need to trim at all!
How to Assemble a Three Layer Cake
Remove cake layers from the freezer. Place the bottom layer of cake on your cake stand and spread about ¼ of the chocolate buttercream on top and smooth into an even layer.
Then top with the next layer and repeat. Place the final cake layer upside down so that the top of your cake is as even as possible.

Smooth a small amount of the buttercream on the top and sides of the cake. Then place the cake in the freezer for about 20 minutes.
This is the crumb coat and helps the rest of the buttercream go on in a smooth layer!

Smooth the rest of the buttercream on the top and sides of the cake. Don't worry if it isn't perfect because the chocolate ganache will cover the top!
Place back in the freezer for another 20 minutes before pouring the ganache on top. This is important for getting the ganache to solidify while dripping!

How to Make the Chocolate Ganache Drip
Finely chop the dark chocolate and place into a large bowl.
Place the heavy cream in a microwave safe bowl and microwave for 1-2 minutes or until hot to the touch but not boiling.
Pour over the chopped chocolate and let sit for about two minutes.
Using a spatula, gently mix until the chocolate is fully melted and the ganache is fully combined and smooth.
The ganache should be a smooth, pourable consistency.

Remove the cake from the freezer and pour the ganache on top. Use an offset spatula to gently push some of the chocolate off the edges to create the drip effect.

Place the cake back in the freezer for another 10-15 minutes so that the ganache can fully set.
Store the cake in the fridge until ready to serve.

How to Get Perfect Cake Layers
There are a few tricks that will help you get perfect, even layers for your triple chocolate cake!
First, you need good nonstick cake pans and pan spray. I use three 6×2 inch Fat Daddio’s layer cake pans and I love them!! It's super important to get actual layer cake pans because the sides are perfectly straight! It's a little annoying because this means you can't stack them, but your layers will have perfect sides! With just a tiny bit of pan spray, the cakes just slide right out and never stick! For pan spray, I love both Everbake Pan Spray and Baker's Joy!
Next, is trimming your cake. This can be a little tricky, but it's super easy once you do it a couple times. Let the cakes cool completely to room temperature, then take a large bread knife and very carefully slice off the very top of the cake so that you have a perfectly even layer. I like using a big bread knife because it's sharp, serrated, and long enough to go through the entire layer at one time.

And of course freezing the layers! So after you've let the cake layers cool completely and trimmed them. Wrap each layer tightly in plastic wrap in place in the freezer overnight. Don't take them out until right before you start assembling the cake! This allows the frosting to slide on smoothly and prevents any crumbs from getting in the frosting.
Tips for the Best Baked Goods
Use room temperature ingredients! Always make sure ingredients like butter, eggs, milk, yogurt, etc. are at room temperature before baking (unless the recipe indicates otherwise)! This ensures they'll incorporate into the batter more easily and leads to overall better texture. Remove all ingredients from the fridge 30 minutes to an hour before baking for best results.
Measure your flour correctly! It's most accurate to use a kitchen scale, but if you're measuring by volume you want to spoon and level! Fluff up the flour a bit with a spoon, and then spoon flour into the measuring cup. Once it's overflowing, use the back of a knife to level it off. Don't ever pack flour into the measuring cup or you'll end up with way too much! Improperly measured flour can lead to dry, dense baked goods. [Measure cocoa powder the same way!]
Use an oven thermometer! Just because your oven says it's 350, doesn't mean it is! If you oven hasn't been calibrated recently, it can be as much as 30 degrees off, which will negatively affect all baked goods from cakes to macarons! An oven thermometer is the easiest/cheapest way to ensure your oven is always at the proper temperature.
Make sure you baking powder is fresh! Baking powder is important for helping baked goods rise properly, but it has a relatively short shelf life once opened, so it's one of the few items I never buy in bulk! To test if your baking powder is still fresh, add a small amount to boiling water. If it bubbles it's still good to use, but if not it's time to toss it!
Cake Decorating Tips
I absolutely love my rotating cake stand! I hesitated buying one for a long time, but it really does make getting nice, even frosting so much easier!
My must have tools for frosting cakes are an offset spatula and an icing smoother. Both are super helpful in achieving that perfect, smooth outside frosting.
I use a 6 inch cake board to transfer my cakes from the turning caking stand, to the stand I like to photograph with.
The best thing about this triple chocolate layer cake, is that all you need to make it look beautiful is the dark chocolate ganache drip!

Recipe FAQ's
Store the cake in the fridge for up to 4 days. However, it will taste best when served at room temperature! I like to let it sit at room temperature for about an hour before serving.
Yes!! The chocolate cake layers can be made and frozen up to a month in advance! Wrap the layers indivuvally with plastic wrap, and then seal in a freezer safe bag for the best results.
This recipe is designed for 3 six inch cake pans. But it will also work well with 2 eight inch cake pans.
Yes! Freezing the cake for 15-20 minutes helps the chocolate ganache set quickly for that beautiful drip effect.
Yes! I recommend freezing the cake in individual slices. Tightly wrap cake slices in plastic wrap and freeze for up to 3 months. Let come to room temperature before eating!
Tips for Success!
For best results I always recommend using weight measurements (especially when baking) because it's the most accurate. Kitchen scales are super affordable and also reduce the number of dishes you have to do! However, all my recipes also include US customary measurements for convince. Use this chart to convert measurements for common ingredients!
Substitutions: In all my recipes, I've included substitutions that I know will work, but I cannot guarantee results if you substitute ingredients that I have not recommended. [For example, granulated sugar and honey are indeed both sweeteners but they have very different properties so they can not always be swapped 1:1. Using honey in a cookie recipe that calls for granulated sugar will yield a giant mess.] In the recipe card you'll find links to the specific ingredients/brands that I use.
A note on salt: I almost exclusively use Diamond Crystal Kosher Salt because it's the best all-purpose salt for cooking and baking. If you're not using kosher salt, consult this handy guide for a conversion chart! When in doubt, if you're using table salt just reduce the amount by half for baked goods. When cooking, I prefer to under-salt because you can always add more! If you've over-salted, adding a little bit of acid (like lemon juice) can help.
More Chocolate Recipes!


If you love this recipe, please leave a star rating at the bottom of the page! This provides helpful feedback to both me and other readers.
Also be sure to add us as a trusted site on Google so that our recipes show up more in your searches!
For more delicious, scratch-made recipes you can subscribe to my newsletter and follow along on social media!
Recipe Card
Triple Chocolate Layer Cake
Special Equipment
Ingredients
Chocolate Cake
- 1 ¾ cup cake flour, substitute all purpose flour
- 1 ½ cups granulated sugar
- ½ cup unsweetened Dutch cocoa powder, see notes to sub natural cocoa
- 2 teaspoons espresso powder, optional
- 2 teaspoons baking powder
- ½ teaspoon kosher salt
- ¾ cup vegetable oil
- 3 large eggs, room temperature
- ½ cup whole milk, substitute hot water
- 1 teaspoon vanilla extract
- ½ cup hot brewed espresso, substitute hot water
Chocolate Buttercream
- 1 ½ cups unsalted butter, room temperature
- 3 cups powdered sugar
- 1 cup unsweetened cocoa powder
- ½ teaspoon espresso powder, optional
- ¼ teaspoon kosher salt
- 3 tablespoons heavy cream
Chocolate Ganache
- 8 ounces dark chocolate, chopped
- ¾ cup heavy cream
Instructions
Cake Layers
- Preheat the oven to 350°F.
- In a small bowl, whisk together the flour, sugar, cocoa powder, espresso powder, baking powder, and salt. Set aside.
- In a separate large bowl, whisk together the vegetable oil, eggs, milk, and vanilla.
- Brew the espresso or coffee right before this step so that it's very hot! Slowly drizzle in the hot espresso while continuously whisking. [It's important to go slowly so that the eggs come up to temperature gradually and don't scramble.]
- Gently mix in the dry ingredients until just combined. The batter will be thin.
- Evenly spray each cake pan with an oil based pan spray.
- Pour ⅓ of the batter into each cake pan (they will only be about half full).
- Bake at 350°F for 25-30 minutes or until a cake tester comes out clean.
- Place a cooling rack on top of each cake pan and invert. The pan should slide cleanly away.
- Let the cakes cool completely to room temperature before trimming.
- Once the cakes are fully cooled. Using a sharp bread knife, trim the cakes until the layers are even. Wrap each layer tightly in plastic wrap and place in the freezer overnight (minimum 30 minutes).
Chocolate Buttercream
- In a large bowl using a handheld or stand mixer fitted with a paddle attachment, cream the room temperature butter and powdered sugar until smooth.
- Add in the cocoa powder, espresso powder, and salt and mix until fully combined.
- Then slowly add in the cream until combined.
- Beat the frosting on high for 4-5 minutes until light and fluffy.
Assemble the Cake
- Remove cake layers from the freezer. Place the bottom layer of cake on your cake stand and spread about ¼ of the chocolate buttercream on top and smooth into an even layer.
- Then top with the next layer and repeat. Place the final cake layer upside down so that the top of your cake is as even as possible.
- Smooth a small amount of the buttercream on the top and sides of the cake. Then place the cake in the freezer for about 20 minutes.
- This is the crumb coat and helps the rest of the buttercream go on in a smooth layer!
- Smooth the rest of the buttercream on the top and sides of the cake. Don't worry if it isn't perfect because the chocolate ganache will cover the top!
- Place back in the freezer for another 20 minutes before pouring the ganache on top. This is important for getting the ganache to solidify while dripping!
Chocolate Ganache
- Finely chop the dark chocolate and place into a large bowl.
- Place the heavy cream in a microwave safe bowl and microwave for 1-2 minutes or until hot to the touch but not boiling.
- Pour over the chopped chocolate and let sit for about two minutes.
- Using a spatula, gently mix until the chocolate is fully melted and the ganache is fully combined and smooth.
- The ganache should be a smooth, pourable consistency.
- Remove the cake from the freezer and pour the ganache on top. Use an offset spatula to gently push some of the chocolate off the edges to create the drip effect.
- Place the cake back in the freezer for another 10-15 minutes so that the ganache can fully set.
- Store the cake in the fridge until ready to serve.
Notes
Nutrition
The nutritional information on this website is only an estimate and is provided for convenience and as a courtesy only. The accuracy of the nutritional information for any recipe on this site is not guaranteed.
Pin This Recipe!

NL says
How many people will this serve
Kyleigh Sage says
It serves 16!
Kelsey says
Hello! I'm looking at making this in advance for a birthday. Is it okay to leave in the freezer for a week or two before icing?
Kyleigh Sage says
Yes absolutely!! Just make sure it’s wrapped tightly and then in an airtight container so that the layers don’t dry out or get freezer burn!
Giorgio says
Great cake and very useful tips! Thanks!