

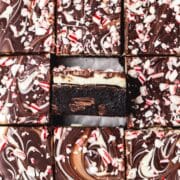
Chocolate and peppermint is one of the best Christmas flavor combinations! These peppermint bark brownies have a rich, fudgy brownie base topped with swirled peppermint bark for an easy, festive Christmas dessert!
Typically, peppermint bark has a layer of melted dark chocolate topped with a layer of melted white chocolate, then sprinkled with crushed candy canes. Then after it hardens it's broken into bite size pieces! So I decided it was the perfect topping for these fudgy peppermint brownies! But instead of 2 distinct layers of chocolate, I swirled them together for an even more beautiful treat!

Jump to:
Why You'll Love These Brownies!
- Super thick, fudgy peppermint brownies!
- Stunning swirled peppermint bark topping
- Easy to make and share for the winter holidays!
- The best Christmas brownies for a holiday party, cookie exchange, or to leave out for Santa!
You might also like these peppermint bark cupcakes, these red wine brownies, or these peppermint chocolate cookies!

Ingredient Notes
You just need a few ingredients to make these Christmasy peppermint bark brownies!

Cocoa Powder - My absolute favorite cocoa powder to use in my baking is the King Arthur Flour Triple Cocoa Blend! It's a blend of natural, Dutch, and black cocoa and is perfect for any baking. But this recipe will work great with whatever cocoa you have on hand! You can use either natural cocoa or Dutch processed cocoa!
Butter - I like using melted butter for flavor, but you can also sub a neutral vegetable oil if you prefer.
Chocolate Chunks - This is optional, but I love mixing chunks of chocolate into the brownie batter. Just chop up one of our favorite dark chocolate bars! Chocolate chips work well too!
Peppermint Extract - You can find peppermint extract next to the vanilla at the grocery store or online! Just note that peppermint extract is very strong, so you only need a little bit for great peppermint flavor!
White & Dark Chocolate - Chocolate baking bars are best because they melt the most smoothly! You can also use chocolate melting wafers, but I don't recommend chocolate chips as they contain emulsifiers and won't melts as beautifully.
Coconut Oil - This is optional, but adding a little bit of coconut oil helps the chocolate melt into a perfect even layer for the bark! I prefer to use refined coconut oil so that it doesn't have any coconut flavor, but you can also use a neutral vegetable oil or shortening instead!
Candy Canes - You can use crushed candy canes or crushed peppermints for the peppermint bark topping!
The complete list of ingredients and amounts is located in the recipe card below.
How to Make Fudgy Brownies
Preheat the oven to 350°F.
Whisk together the melted butter, brown sugar, granulated sugar, and peppermint extract.
Add in the eggs one at a time and whisk each one until fully incorporated and the batter starts to get lighter in color.


Fold in the cocoa powder, flour, and salt and mix until the batter is just combined.
Then gently fold in the chocolate chunks if desired.


Cut a parchment paper sling slightly smaller than the width of the cake pan and make sure it fits flatly in the bottom. Then lightly spray the bottom and sides of the pan with a vegetable oil based spray (I love Bakers Joy or Everbake). Place you parchment paper sling in the bottom of the pan and smooth it out so that it sticks to the pan spray (you can use metal binder clips to secure it to the pan). After baking you’ll be able to just slide the brownies right out of the pan!
I love all of my USA Pan cake pans because they are extremely sturdy and truly nonstick. However, I still like to prepare my pans to ensure the peppermint brownies come out easily.
Pour the batter into your prepared baking pan.


Bake at 350°F for 30-40 minutes or until an inserted knife comes out mostly clean.
Remove from the oven and let fully cool in the pan.
Add the chopped white chocolate and 1 ½ teaspoons of coconut oil to a microwave safe bowl. Melt in intervals of 20 seconds and stir in between each interval until fully melted and smooth. Stir in ¼ teaspoon of peppermint extract if desired.
In a separate microwave safe bowl, add the chopped dark chocolate and ¼ teaspoon of coconut oil. Melt in intervals of 20 seconds and stir in between each interval until fully melted and smooth.


While the peppermint brownies are still in the pan, pour the melted white chocolate over the top and smooth into an even layer.


Transfer the melted dark chocolate to a piping bag (or a plastic sandwich bag) and cut a small hole in the tip. Then pipe stripes of melted dark chocolate over the white chocolate layer. Then using a butter knife or skewer, create fun swirls in the top of chocolate!


Generously sprinkle the top with crushed peppermint pieces. Then place the brownies in the fridge for at least 20 minutes to let the peppermint bark layer firm up.

Once the chocolate has hardened, use the edges of the parchment paper to slide the brownies out of the pan.

Slice the brownies while still cold for nice clean cuts, but enjoy the peppermint bark brownies at room temperature for the best fudgy texture!

Tips for the Best Brownies!
(and blondies too!)
Use room temperature ingredients! Always make sure ingredients like butter, eggs, milk, etc. are at room temperature before baking (unless the recipe indicates otherwise)! This ensures they'll incorporate into the batter more easily and leads to overall better texture. Remove all ingredients from the fridge 30 minutes to an hour before baking for best results.
Measure your flour correctly! It's most accurate to use a kitchen scale, but if you're measuring by volume you want to spoon and level! Fluff up the flour a bit with a spoon, and then spoon flour into the measuring cup. Once it's overflowing, use the back of a knife to level it off. Don't ever pack flour into the measuring cup or you'll end up with way too much! Improperly measured flour can lead to dry, dense baked goods. Same goes for cocoa powder!
Use an oven thermometer! Just because your oven says it's 350, doesn't mean it is! If you oven hasn't been calibrated recently, it can be as much as 30 degrees off, which will negatively affect all baked goods from cakes to macarons! An oven thermometer is the easiest/cheapest way to ensure your oven is always at the proper temperature.
Use a metal baking pan! Not all materials are created equal when it comes to baking. Metal cake pans conduct heat much better than other materials like glass or ceramic, so your baked goods will cook faster and more evenly!
It's better to undercook the brownies slightly, than overcook them! Brownies will dry out quick, so it's best to err on the side of caution when baking brownies! Bake just until an inserted toothpick comes out mostly clean but still a tad gooey. If you aren't sure, just go ahead and take them out because they'll continue to firm up as they cool. Note: the larger the pan, the less time the brownies will take to cook.
Be patient and let them cool. Warm brownies fresh out of the oven are delish, I know. But it's best to let them fully cool before digging in. The brownies will be less likely to crumble when you cut them and the center is more likely to be fully cooked while still being perfectly fudgy.
Special Equipment

Recipe FAQ's
Brownies are best eaten within the first 2-3 days, but will keep in an airtight container at room temperature for up to 5 days.
To get clean slices of these peppermint bark brownies, run a super sharp knife under hot water until the blade is warm, then wipe it dry. Then cut a single slice and repeat. It's a bit tedious to clean the knife before every cut, but you get perfect slices every time!
Adding a little bit of oil (you can use coconut oil, vegetable oil, or shortening), helps the chocolate melt smoothly. It also makes the chocolate just slightly softer so that it's easier to cut and bite into once it sets.
Yes! But I recommend freezing the brownies before adding the peppermint bark layer! Freeze the brownies or up to 3 months, then let thaw in the fridge overnight before topping with the peppermint bark.
Tips for Success!
For best results I always recommend using weight measurements (especially when baking) because it's the most accurate. Kitchen scales are super affordable and also reduce the number of dishes you have to do! However, all my recipes also include US customary measurements for convince. Use this chart to convert measurements for common ingredients!
Substitutions: In all my recipes, I've included substitutions that I know will work, but I cannot guarantee results if you substitute ingredients that I have not recommended. [For example, granulated sugar and honey are indeed both sweeteners but they have very different properties so they can not always be swapped 1:1. Using honey in a cookie recipe that calls for granulated sugar will yield a giant mess.] In the recipe card you'll find links to the specific ingredients/brands that I use.
A note on salt: I almost exclusively use Diamond Crystal Kosher Salt because it's the best all-purpose salt for cooking and baking. If you're not using kosher salt, consult this handy guide for a conversion chart! When in doubt, if you're using table salt just reduce the amount by half for baked goods. When cooking, I prefer to under-salt because you can always add more! If you've over-salted, adding a little bit of acid (like lemon juice) can help.

More Recipes You Might Like!


If you love this recipe, please leave a star rating at the bottom of the page! This provides helpful feedback to both me and other readers.
Also be sure to add us as a trusted site on Google so that our recipes show up more in your searches!
For more delicious, scratch-made recipes you can subscribe to my newsletter and follow along on social media!
Recipe Card
Peppermint Bark Brownies
Special Equipment
Ingredients
Brownies
- 1 ¼ cup unsalted butter, melted
- 1 ½ cups light brown sugar
- 1 cup granulated sugar
- 1 teaspoon peppermint extract
- 4 large eggs, room temperature
- 1 ½ cups unsweetened cocoa powder
- ¾ cups all purpose flour
- ½ teaspoon kosher salt
- ½ cup dark chocolate, chopped (optional)
Peppermint Bark
- 1 ½ cups white chocolate, (12 ounces)
- ¼ cup dark chocolate, (2 ounces)
- 1 ¾ teaspoons coconut oil, divided
- ¼ teaspoon peppermint extract, optional
- ½ cup crushed candy canes
Instructions
Brownies
- Preheat the oven to 350°F.
- Whisk together the melted butter, brown sugar, granulated sugar, and peppermint extract.
- Add in the eggs one at a time and whisk each one until fully incorporated and the batter starts to get lighter in color.
- Fold in the cocoa powder, flour, and salt and mix until the batter is just combined.
- Then gently fold in the chocolate chunks if desired.
- Cut a parchment paper sling slightly smaller than the width of the cake pan and make sure it fits flatly in the bottom. Then lightly spray the bottom and sides of the pan with a vegetable oil based spray. Place you parchment paper sling in the bottom of the pan and smooth it out so that it sticks to the pan spray (you can use metal binder clips to secure it to the pan). After baking you’ll be able to just slide the brownies right out of the pan!
- Pour the batter into your prepared baking pan.
- Bake at 350°F for 30-40 minutes or until an inserted knife comes out mostly clean.
- Remove from the oven and let fully cool in the pan.
Peppermint Bark
- Add the chopped white chocolate and 1 ½ teaspoons of coconut oil to a microwave safe bowl. Melt in intervals of 20 seconds and stir in between each interval until fully melted and smooth. Stir in ¼ teaspoon of peppermint extract if desired.
- In a separate microwave safe bowl, add the chopped dark chocolate and ¼ teaspoon of coconut oil. Melt in intervals of 20 seconds and stir in between each interval until fully melted and smooth.
- While the peppermint brownies are still in the pan, pour the melted white chocolate over the top and smooth into an even layer.
- Transfer the melted dark chocolate to a piping bag (or a plastic sandwich bag) and cut a small hole in the tip. Then pipe stripes of melted dark chocolate over the white chocolate layer. Then using a butter knife or skewer, create fun swirls in the top of chocolate!
- Generously sprinkle the top with crushed peppermint pieces. Then place the brownies in the fridge for at least 20 minutes to let the peppermint bark layer firm up.
- Once the chocolate has hardened, use the edges of the parchment paper to slide the brownies out of the pan. Slice the brownies while still cold for nice clean cuts, but enjoy the peppermint bark brownies at room temperature for the best fudgy texture!
- Brownies are best eaten within the first 2-3 days, but will keep in an airtight container at room temperature for up to 5 days.
Video
Notes
Nutrition
The nutritional information on this website is only an estimate and is provided for convenience and as a courtesy only. The accuracy of the nutritional information for any recipe on this site is not guaranteed.

jessa says
my fave brownie recipe fr