
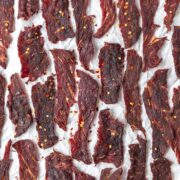
There's nothing I love more than homemade beef jerky but I know most people don't own a dehydrator. Luckily, making beef jerky in the oven is surprisingly easy!
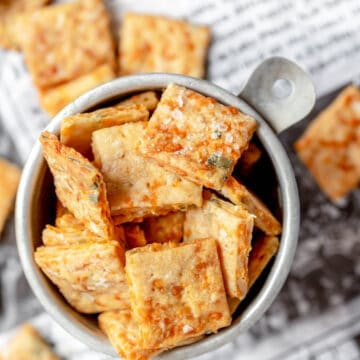
Homemade beef jerky is a great snack for camping, a lunchbox, or game-day!

Jump to:
Ingredient Notes
To make homemade beef jerky you really just need meat and then your favorite flavorful marinade!
What type of meat is best for jerky?
Almost any lean cut of meat will work well for jerky! You don't want to use a cut with a lot of fat as the fat doesn't render while dehydrating. My favorite is a top round (also called london broil) but there are several popular options!
- Top round (london broil)
- Flank steak
- Skirt steak
- Bottom round
- Sirloin tip
How to cut meat for jerky?
You want to slice the meat somewhere between ⅛" and ¼" thick. The thinner the slices, the dryer and less chewy the jerky will be. But the thicker it is, the longer it takes to fully dry.
For chewy jerky - slice along the grain.
For more tender jerky - slice against the grain.
Also be sure to trim away any large chunks of fat.

The best beef jerky marinade!
You can use whatever marinade you prefer, but I just love this simple soy based marinade! It's savory, aromatic, and just a tad spicy!
You need:
- Soy sauce
- Liquid smoke - this adds the perfect slightly smoky flavor to the jerky!
- Lime juice - you could also use lemon juice or orange juice!
- Honey - substitute maple syrup or brown sugar.
- Red pepper flakes - omit if you prefer a less spicy beef jerky. Ground cayenne pepper is also a good substitute.
- Garlic - I love adding finely minced garlic to the marinade because it has a stronger flavor, but garlic powder works well too.
- Ginger - similarly to the garlic, I like using fresh ginger but you can leave it out or use ginger powder instead.
Pink Curing Salt
This is optional, but highly recommended! Pink curing salt (also called Cure #1, Prague Powder #1, or just pink salt) contains a small amount of sodium nitrite. This helps prevent bacteria growth and also improves the color of the jerky. Pink curing salt is toxic if consumed in large quantities, but the tiny amount added to jerky marinade is perfectly safe! You only need ¼ teaspoon per pound of meat.
How to Make Jerky That's Safe to Consume
Adding the pink curing salt to the marinade is one way to help ensure the jerky is safe to eat!
The other method is to bring the meat up to 160°F before dehydrating (source: USDA). So to do this we'll roast the meat at 300°F for 10 minutes before we start trying to dehydrate it.
It's also important to marinate the beef strips in the fridge and not leave them at room temperature for any extended period of time!
How to make Beef Jerky in the Oven
Thinly slice the meat between ⅛" and ¼" thick.
In a medium sized bowl, whisk together all the marinade ingredients until fully combined.
Add in the meat slices and toss to coat.


Cover and refrigerate for 24 to 48 hours! Marinating the meat for a long time makes the jerky SO flavorful and helps tenderize tougher cuts of beef.
Discard the marinade and gently pat the slices of beef dry. Skewer the meat so that it hangs straight down, with at least 1 inch between each piece. This will allow the air to fully circulate around the meat so that it dries more quickly.

Line the bottom of your oven with aluminum foil (do NOT skip this unless you want to be scrubbing burnt marinade off the bottom of your oven for the rest of time).
Preheat the oven to 300°F
Place the skewers across the oven racks so that the strips hang down.


Bake the meat for 10 minutes at 300°F.
Then turn your oven down to the lowest temperature it can go (most home ovens go down to about 170°F). Typically beef jerky is dehydrated between 140°F and 150°F and there is some type of air circulation. So to achieve similar results with your home oven, crack the door open and use a wooden spoon to hold the door open in that position.
Continue to dry the jerky for 4 to 8 hours depending on the thickness of the jerky. The jerky is done when it's completely dry but is still somewhat pliable and bends without breaking.
After about 2 hours I like to check the jerky every 30 minutes observe the progress. Depending on your oven, the back by dry more quickly than the front, so it's okay to begin removing some pieces before the rest are dry!
Once the beef jerky is fully dry, let cool to room temperature before storing.
For best results and the longest shelf life, vacuum seal the jerky for storing! I love my Zwilling Fresh and Save Set for storing this beef jerky!

Can I make this jerky in a dehydrator?
Yes of course!! Since the initial publishing of this recipe, I bought a dehydrator and it really is so much easier and less messy!
This oven jerky method is tried and true and works great if you don't want to buy a dehydrator, but if you're in the market for one I highly recommend the 6 rack Cosori Dehydrator! It's large and a bit of a pain to store, but oh is it a workhorse! It can dehydrate about 3-4 pounds of jerky at a time and I've found it super easy to clean!
To make this beef jerky in a dehydrator, use the same marinade/prep instructions. Then pat the pieces dry and place on the dehydrator racks. Set your dehydrator to 145°F and dehydrate for 3-6 hours.

Recipe FAQ's
If stored in a vacuum sealed bag, homemade jerky will last at room temperature for up to a month. But if stored in a regular ziploc bag, it's best consumed within 1 to 2 weeks. Always store in a cool, dry, dark place!
Typically yes! Depending on which cut of beef you use, homemade jerky can be significantly cheaper than store-bought. I always try to buy meat on sale or at Costco to reduce the cost!

More Recipes You Might Like


If you love this recipe, please leave a star rating at the bottom of the page! This provides helpful feedback to both me and other readers.
Also be sure to add us as a trusted site on Google so that our recipes show up more in your searches!
For more delicious, scratch-made recipes you can subscribe to my newsletter and follow along on social media!
Recipe Card
Homemade Beef Jerky (in the oven!)
Special Equipment
- aluminum foil
Ingredients
- 2 pounds top round, london broil, or flank steak
- 1 cup soy sauce
- ¼ cup lime juice
- 2 tablespoons honey, substitute brown sugar or maple syrup
- 1 teaspoon liquid smoke
- 2 teaspoons minced garlic, substitute garlic powder
- 1 teaspoon minced ginger, substitute ground ginger
- 2 teaspoons red pepper flakes
- 1 teaspoon ground black pepper
- ½ teaspoon pink curing salt, also called Prague Powder #1 (use ¼ teaspoon per pound of meat)
Instructions
- Thinly slice the meat between ⅛" and ¼" thick.
- In a medium sized bowl, whisk together all the marinade ingredients until fully combined.
- Add in the meat slices and toss to coat.
- Cover and refrigerate for a minimum of 12 hours up to 48 hours (I find about 24 hours to be the sweet spot)! Marinating the meat for a long time makes the jerky SO flavorful and helps tenderize tougher cuts of beef.
- Discard the marinade and gently pat the slices of beef dry. Skewer the meat so that it hangs straight down, with at least 1 inch between each piece. This will allow the air to fully circulate around the meat so that it dries more quickly.
- Line the bottom of your oven with aluminum foil (do NOT skip this unless you want to be scrubbing burnt marinade off the bottom of your oven for the rest of time).
- Preheat the oven to 300°F
- Place the skewers across the oven racks so that the strips hang down.
- Bake the meat for 10 minutes at 300°F.
- Then turn your oven down to the lowest temperature it can go (most home ovens go down to about 170°F). Typically beef jerky is dehydrated between 140°F and 150°F and there is some type of air circulation. So to achieve similar results with your home oven, crack the door open and use a wooden spoon to hold the door open in that position.
- Continue to dry the jerky for 4 to 8 hours depending on the thickness of the jerky. The jerky is done when it's completely dry but is still somewhat pliable and bends without breaking.
- After about 3 hours I like to check the jerky every 30 minutes observe the progress. Depending on your oven, the back by dry more quickly than the front, so it's okay to begin removing some pieces before the rest are dry!
- Once the beef jerky is fully dry, let cool to room temperature before storing.
- For best results and the longest shelf life, vacuum seal the jerky for storing! I love my Zwilling Fresh and Save Set for storing this beef jerky!
Notes
Nutrition
The nutritional information on this website is only an estimate and is provided for convenience and as a courtesy only. The accuracy of the nutritional information for any recipe on this site is not guaranteed.
Hannah says
Hi, I’m wondering what the yield of this recipe is?
Kyleigh Sage says
2 pounds of meat will yield about 8 ounces of jerky!
Cobia says
This recipe clearly states that beef needs to reach a temperature of 160 degrees F to be safe. The lowest setting on my oven is 170 degrees F. If I am drying my jerky for hours at 170 degrees, what’s the point of baking it at 300 degrees prior to “make it safe”?
Kyleigh Sage says
Because I recommend cracking the oven door open for the entirety of the drying time to introduce more airflow to aid in drying and if the oven is cracked open the temperature will drop below 170 even if that is what your oven is set at. So baking at 300 is an option for anyone who wants to be extra sure the beef is cooked to a safe temperature. You don't have to follow my recommendations if you don't want to.
Cobia says
Some ovens, like my dual oven Kenmore Elite that is 10 years old, shut off the burners when the door is cracked, so you might consider mentioning that possibility in your process. I really do enjoy your presentation! Lots of good information… perhaps more overall understanding of the mechanics behind the recipe would be useful.
Cobia says
OMG!! Do NOT put regular aluminum foil on the bottom of the oven before heating the oven! The high heat coming from the coils beneath the oven floor will breathe brown the aluminum foil and trash your oven! Using special “high aluminum foil” is supposed to be ok… but why chance it???