
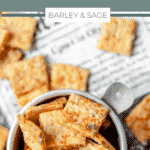
These cheesy homemade crackers are made with leftover sourdough starter discard, shredded Parmesan cheese, and fresh herbs! They're super fun and easy to make! It's my favorite way to use up my discard!

You might also like these sourdough blueberry muffins or these sourdough biscuits!
Jump to:
Ingredient Notes
You only need 6 ingredients to make these sourdough discard crackers!

Sourdough Starter - I typically use my sourdough discard for these crackers because it's a great way to use it up, but I've also used fresh starter and it works just as well! Don't have a sourdough starter? Just check out my sourdough guide for all my tips for making your own sourdough starter at home!
Parmesan - Not only does shredded cheese add a ton of flavor to the crackers, but it also helps makes them nice and crispy!
Fresh Herbs - I love the combo of fresh sage and parmesan in these crackers, but you can use whatever fresh herbs you prefer!
Flaky Sea Salt - I always had flaky sea salt to the tops of these crackers for both flavor and looks! I love using Maldon Flaky Sea Salt because it has the best flavor and texture.
The complete list of ingredients and amounts is located in the recipe card below.
Flavor Variations
The best thing about these sourdough crackers is that you can easily switch up the ingredients for a ton of different flavors! Some of my other favorites are:
- Cheddar cheese - this is one of my favorite variations, just think fancy Cheez Its! You can also add in chopped chives.
- Olive oil and rosemary - swap out the butter for olive oil and add fresh rosemary.
- Whole wheat crackers - swap out whole wheat flour for a healthier cracker.
Sourdough Tips & Tricks
If you've never baked with sourdough before, it can be a little tricky. But don't worry, I have a full Sourdough Starter Guide all about making and maintaining a sourdough starter! I also have a full guide on different types of flour you can use to make sourdough and of course a guide on how to make a Beginner Homemade Sourdough Loaf. Below are a few quick tips and key terms you need to know.
- Sourdough Starter - A culture of wild yeast and bacteria that leavens and flavors sourdough bread. I use what's called a "liquid starter" versus a stiff starter. This means the starter is made with equal parts flour and water and should be a consistency similar to cake batter.
- Sourdough Discard - The portion of your starter that is discarded when feeding your starter (can be used in tons of recipes like sourdough discard blueberry muffins or sourdough pancakes).
- Ripe Starter - A starter that's ready to be used in baking. Your starter is ripe roughly 6 hours after feeding and will have doubled in size, have lots of visible bubbles, and a fresh acidic aroma.
Weigh your ingredients! For all my sourdough recipes, I measure the ingredients in grams because it's much more accurate! I highly recommend getting a kitchen scale if you don't already have one! However, I have included alternate US customary measurements for your convenience.
Use an oven thermometer! Just because your oven says it's 350, doesn't mean it is! If your oven hasn't been calibrated recently, it can be as much as 30 degrees off, which will negatively affect all breads and baked goods! An oven thermometer is the easiest/cheapest way to ensure your oven is always at the proper temperature.
Easy sourdough recipes for beginners! If you've never made sourdough bread before, I recommend starting with some simple, no-fuss recipes like my sourdough naan or sourdough bagels! But if you're already a pro, I have a ton of fun sourdough recipes you can try!
How to Make Sourdough Crackers
In a large bowl, mix together all of the dough ingredients until it forms a cohesive ball. The dough should be soft but not sticky. If the dough is too dry, add water 1 teaspoon at a time until it comes together. If the dough is too wet, add flour 1 teaspoon at a time.
Divide the dough in half and cover tightly with plastic wrap. Place in the fridge for at least 45 minutes to allow the dough to firm up. The dough can be left in the fridge for up to two days before baking.


Preheat the oven 350°F.
Place half of the dough in between two sheets of parchment paper. Then use a rolling pin to roll it to about ⅛th of an inch thick. Carefully peel off the top sheet of parchment paper. Transfer the parchment paper to a baking sheet. Repeat with the other half of the dough.


Using a sharp knife or pizza cutter, cut the cracker dough into 1 inch squares. Gently prick each square with a fork to help air escape in the oven.
Lightly brush the tops of the crackers with melted butter and sprinkle with flaky sea salt.


Bake the sourdough crackers at 350°F for 20-30 minutes (rotating the pan halfway through baking) or until golden brown and crisp on the edges. Turn off the oven and crack the door open slightly. Leave the crackers in the turned off oven to allow them to cool and continue drying out.

Tips for Success!
For best results I always recommend using weight measurements (especially when baking) because it's the most accurate. Kitchen scales are super affordable and also reduce the number of dishes you have to do! However, all my recipes also include US customary measurements for convince. Use this chart to convert measurements for common ingredients!
Substitutions: In all my recipes, I've included substitutions that I know will work, but I cannot guarantee results if you substitute ingredients that I have not recommended. [For example, granulated sugar and honey are indeed both sweeteners but they have very different properties so they can not always be swapped 1:1. Using honey in a cookie recipe that calls for granulated sugar will yield a giant mess.] In the recipe card you'll find links to the specific ingredients/brands that I use.
A note on salt: I almost exclusively use Diamond Crystal Kosher Salt because it's the best all-purpose salt for cooking and baking. If you're not using kosher salt, consult this handy guide for a conversion chart! When in doubt, if you're using table salt just reduce the amount by half for baked goods. When cooking, I prefer to under-salt because you can always add more! If you've over-salted, adding a little bit of acid (like lemon juice) can help.
More Sourdough Recipes!


If you love this recipe, please leave a star rating at the bottom of the page! This provides helpful feedback to both me and other readers.
Also be sure to add us as a trusted site on Google so that our recipes show up more in your searches!
For more delicious, scratch-made recipes you can subscribe to my newsletter and follow along on social media!
Recipe Card

Cheesy Sourdough Discard Crackers
Special Equipment
Ingredients
Crackers
- 227 grams sourdough starter discard
- 90 grams water, room temperature
- 227 grams all purpose flour
- 6 grams kosher salt
- 80 grams unsalted butter, melted
- 227 grams parmesan cheese, shredded
- 2 tablespoons fresh sage, roughly chopped
Top with
- 2 tablespoons unsalted butter, melted
- flaky sea salt
Instructions
- In a large bowl, mix together all of the dough ingredients until it forms a cohesive ball. The dough should be soft but not sticky. If the dough is too dry, add water 1 teaspoon at a time until it comes together. If the dough is too wet, add flour 1 teaspoon at a time.
- Divide the dough in half and cover tightly with plastic wrap. Place in the fridge for at least 45 minutes to allow the dough to firm up. The dough can be left in the fridge for up to two days before baking.
- Preheat the oven 350°F.
- Place half of the dough in between two sheets of parchment paper. Then use a rolling pin to roll it to about ⅛th of an inch thick. Carefully peel off the top sheet of parchment paper. Transfer the parchment paper to a baking sheet. Repeat with the other half of the dough.
- Using a sharp knife or pizza cutter, cut the cracker dough into 1 inch squares. Gently prick each square with a fork to help air escape in the oven.
- Lightly brush the tops of the crackers with melted butter and sprinkle with flaky sea salt.
- Bake the crackers at 350°F for 20-30 minutes (rotating the pan halfway through baking) or until golden brown and crisp on the edges. Turn off the oven and crack the door open slightly. Leave the crackers in the turned off oven to allow them to cool and continue drying out.
- Once the crackers are completely cool, store in an airtight container at room temperature for up to two weeks.
Nutrition
The nutritional information on this website is only an estimate and is provided for convenience and as a courtesy only. The accuracy of the nutritional information for any recipe on this site is not guaranteed.
Melissa says
Love this recipe!! Can’t keep our hands out of the jar. I feel like I make this at least twice a week for my family if 5!
Maureen says
I’ve made these twice now …love that I found a recipe for my discard but even though I’ve made them ultra thin and they are completely dry before puttin in a mason jar…..they only stay crispy the first day…after that they are just so chewy…too much so.! ? Please what am I doing wrong?
Kyleigh Sage says
Any trace of moisture or heat will cause them to get soft in an airtight container so even if they seem dry and fully cool they might not be. Also if you live somewhere very humid and the container wasn't completely airtight, that could also be the issue. Also depending on your oven, the crackers towards the center of the pan can sometimes cook a little slower than the edges, so some just might be slightly underbaked.
Norma says
Love this recipe… one question… I divide dough in two and refrigerate. Do I again divide in two to roll out? So I end up with 4 disks to bake?
Thanks
Kyleigh Sage says
Just two! Each half takes up about one baking sheet.
Jenn says
today will mark the 3rd time making these. the whole family lives them and friends as well. bake time is not right, the will not be crisp. After the initial bake time, I break the crackers up and lay them out evenly and bake another 5-10 minutes
Serenity says
This is basically like Cheeze Its but better! I found that rolling the dough as thin as possible is what works best. I cut off the edges that won't fit on the pan and I re roll that dough into another half-ish pan I can freeze for later or bake after the 2nd pan.
Very delicious, thank you!
Christine Dragomer says
These were so delicious just like a Cheese It! A major hit with my family THANK YOU
Morgan says
Made between a 1/2 serving and 1 full serving and eye balled my own measurements. These came out so tasty!!!! Tastes like Subways Italian herb and cheese bread, hah! It’s more like a soft and skinny breadstick, but delicious nonetheless. I don’t have a rolling pin so I improvised. Probably would be better if I could get them paper thin cause the edges were delicious!
Karen Brooks says
These are yummy!! I ended up with a mix of perfectly crisp and somewhat chewy,in spite of leaving them in the oven to cool. I'm on a learning curve here. I am definitely making again and will pay extra attention to insuring the dough is rolled out exactly 1/8" throughout.
Kyleigh Sage says
Sometimes the ones on the edges will be done before the ones in the middle - so you can remove those first and let the middle ones continue to cook a little longer if needed!
Bonnie Kornelson says
omg sooo good. I did 50g parm and 177g Cheddar. topped with sesame, poppy and salt. so happy as my first recipe i tried i was very disapointed. I'm addicted