
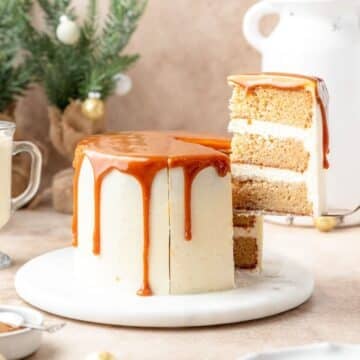
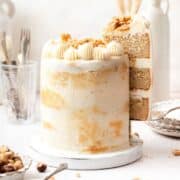
Toasted hazelnuts and browned butter are a match made in heaven! With tender hazelnut cake layers, toasted brown butter buttercream, and crunchy hazelnut praline filling, this three layer cake is a show stopping fall dessert!

Jump to:
Why You'll Love This Cake!
- Brown butter buttercream- The light, fluffy buttercream frosting is made with toasty brown butter that pairs beautifully with the hazelnut cake!
- Moist hazelnut cake base - The cake layers are made with hazelnut flour for a light, tender crumb and extra hazelnut flavor!
- Homemade hazelnut praline filling - The homemade praline adds a fun crunch to the center of the cake!
- Easy to make and decorate - This cake is just uses leftover praline to decorate for a simple, stunning cake!
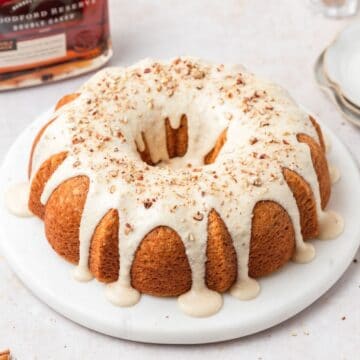
You might also like this bourbon pecan bundt cake, this chocolate espresso layer cake, or these maple bacon cupcakes!

I recommend making layer cakes over the course of 2 days because it's just easier. So make the brown butter, cake layers, and hazelnut praline the day before you plan to assemble the cake!
Ingredient Notes

Cake Flour - I always use cake flour in my cakes because it makes them super soft and tender, but all purpose flour also works great!
Hazelnut Flour - Hazelnut flour is literally just finely ground hazelnuts! I love using it in place of some of the flour for an extra nutty flavor. But it's completely optional! You can buy hazelnut flour at a lot of grocery stores and online (Bob’s Red Mill is my favorite brand for nut flours).
Milk - I use milk in my cakes to keep them nice and moist, but you could also substitute full-fat plain yogurt or sour cream!
Almond Extract - I love using almond extract for a little extra almond flavor and because it compliments the toasted hazelnuts, but you can leave it out if you prefer!
Hazelnuts - You need hazelnuts to make the praline for the filling, but you could also substitute almonds, peanuts, or pecans for a different flavor! I use the dry-roasted, unsalted hazelnuts from Trader Joe's. If you buy raw hazelnuts, you can roast them at 325°F for about 15 minutes and then remove the skins.
Brown Butter - My favorite ingredient of all time is brown butter!! Brown butter is just unsalted butter that has been melted and gently cooked to bring out a toasty, nutty flavor. If you've never made brown butter before, you can check out this post with all my tips for how to make brown butter!
I recommend making the brown butter the night before you make the hazelnut cake so that it has time to fully cool to room temperature!
Since both the cake and the buttercream call for brown butter, I find it easier to just make one large batch and then weigh out the difference using a kitchen scale (½ cup of butter weighs about 113 grams).
However, if you don't have a scale you can just make two separate batches of brown butter!
The complete list of ingredients and amounts is located in the recipe card below.
How to Make Hazelnut Praline
Line a baking sheet with parchment paper and spread the chopped hazelnuts in an even layer. Set aside.
In a saucepan, combine the sugar and water. Cook over medium heat, stirring occasionally until the sugar has melted and turns a deep amber color.


Immediately pour the sugar over the hazelnuts and spread into an even layer. Let cool to room temperature.
Once cool, break into large chunks and set aside about ¼ of the chunks to use to decorate the cake.


Add the remaining chunks to a food processor and blend for about 5 minutes or until it forms a thick paste about the consistency of peanut butter. Initially it will form a fine powder and then continue to blend until a past forms. If the mixture still isn't forming a paste after blending for a few minutes, add vegetable oil 1 teaspoon at a time until it forms a thick paste.


Cover and set aside the hazelnut praline until it's time to decorate the cake.

How to Make Cake Layers
Preheat the oven to 350°F and lightly spray three 6 inch layer cake pans with pan spray.
Whisk the cake flour, hazelnut flour, baking powder, and salt together in a large bowl.
In a separate bowl, whisk the brown butter, brown sugar, and granulated sugar together until combined.


Then add in the eggs, vanilla, and almond extract and mix together until smooth.
Stir in about half of the flour mixture. Then stir in the milk and the rest of the flour mixture and mix until fully combined. The batter will be thick.


Pour ⅓ of the batter into each cake pan (they will only be about half full).


Bake at 350°F for 20-30 minutes or until a cake tester comes out clean.
Place a cooling rack on top of each cake pan and invert. The pan should slide cleanly away.
Let the cakes cool completely to room temperature before trimming.

Once the cakes are fully cooled. Using a sharp bread knife, trim the cakes until the layers are even. Wrap each layer tightly in plastic wrap and place in the freezer overnight (minimum 30 minutes).
How to Assemble a 3 Layer Cake!
Remove cake layers from the freezer. Place the bottom layer of cake on your cake stand and spread a thin layer of buttercream over the top. Then pipe a thick border of buttercream around the edge. Spoon some of the hazelnut praline paste evenly over the middle (about ¼ cup). Place the next layer on top and repeat.

Place the final cake layer upside down so that the top of your cake is as even as possible. Spread a thin layer of buttercream (your crumb coat) over the top and sides of the cake. Then place the cake back in the freezer for 30-60 minutes.


If desired, set aside a small amount of buttercream in a piping back to decorate the top of the cake (a little less than 1 cup is plenty). Evenly smooth the rest of the buttercream on the top and sides of your cake as desired.
For the mottled look on the sides of the cake, place a few small dollops of leftover praline at random places on the side of the cake, and then smooth into the buttercream.


Pipe the remaining buttercream around the top edge of the cake (I used a Wilton 1M tip in these photos). Then sprinkle the remaining chunks of praline over top.
Refrigerate the hazelnut layer cake for 2-3 hours before slicing and serving.

How to Get Perfect Cake Layers
There are a few tricks that will help you get perfect, even layers!
First, you need good nonstick cake pans and pan spray. I use three 6×2 inch Fat Daddio’s layer cake pans and I love them!! It's super important to get actual layer cake pans because the sides are perfectly straight! It's a little annoying because this means you can't stack them, but your layers will have perfect sides! With just a tiny bit of pan spray, the cakes just slide right out and never stick! For pan spray, I love both Everbake Pan Spray and Baker's Joy!
Next, is trimming your cake. This can be a little tricky, but it's super easy once you do it a couple times. Let the cakes cool completely to room temperature, then take a large bread knife and very carefully slice off the very top of the cake so that you have a perfectly even layer. I like using a big bread knife because it's sharp, serrated, and long enough to go through the entire layer at one time.
And of course freezing the layers! So after you've let the cake layers cool completely and trimmed them; wrap each layer tightly in plastic wrap in place in the freezer overnight (or at least 30 minutes). Don't take them out until right before you start assembling the cake! This allows the frosting to slide on smoothly and prevents any crumbs from getting in the frosting.

Tips for the Best Baked Goods
Use room temperature ingredients! Always make sure ingredients like butter, eggs, milk, yogurt, etc. are at room temperature before baking (unless the recipe indicates otherwise)! This ensures they'll incorporate into the batter more easily and leads to overall better texture. Remove all ingredients from the fridge 30 minutes to an hour before baking for best results.
Measure your flour correctly! It's most accurate to use a kitchen scale, but if you're measuring by volume you want to spoon and level! Fluff up the flour a bit with a spoon, and then spoon flour into the measuring cup. Once it's overflowing, use the back of a knife to level it off. Don't ever pack flour into the measuring cup or you'll end up with way too much! Improperly measured flour can lead to dry, dense baked goods. [Measure cocoa powder the same way!]
Use an oven thermometer! Just because your oven says it's 350, doesn't mean it is! If you oven hasn't been calibrated recently, it can be as much as 30 degrees off, which will negatively affect all baked goods from cakes to macarons! An oven thermometer is the easiest/cheapest way to ensure your oven is always at the proper temperature.
Make sure you baking powder is fresh! Baking powder is important for helping baked goods rise properly, but it has a relatively short shelf life once opened, so it's one of the few items I never buy in bulk! To test if your baking powder is still fresh, add a small amount to boiling water. If it bubbles it's still good to use, but if not it's time to toss it!
Cake Decorating Tips
I absolutely love my rotating cake stand! I hesitated buying one for a long time, but it really does make getting nice, even frosting so much easier!
My must have tools for frosting cakes are an offset spatula and an icing smoother. Both are super helpful in achieving that perfect, smooth outside frosting.
I use a 6 inch cake board to transfer my cakes from the turning caking stand, to the stand I like to photograph with.
To decorate all of my cakes and cupcakes, I use this Wilton Decorating Kit and I love it! It’s super easy to use and has a ton of tips in different sizes. For this brown butter hazelnut cake, I used the 1M tip.

Recipe FAQ's
Yes!! The cake layers can be made and frozen up to a month in advance! Wrap the layers indivuvally with plastic wrap, and then seal in a freezer safe bag for the best results.
Yes! This recipe is designed for 3 six inch cake pans. But it will also work well with 2 eight inch cake pans.
Store the cake in the fridge for up to 4 days. However, it will taste best when served at room temperature! I like to let it sit at room temperature for about an hour before serving.
Yes! I recommend freezing the hazelnut cake in individual slices. Tightly wrap cake slices in plastic wrap and freeze for up to 3 months. Let come to room temperature before eating!

Tips for Success!
For best results I always recommend using weight measurements (especially when baking) because it's the most accurate. Kitchen scales are super affordable and also reduce the number of dishes you have to do! However, all my recipes also include US customary measurements for convince. Use this chart to convert measurements for common ingredients!
Substitutions: In all my recipes, I've included substitutions that I know will work, but I cannot guarantee results if you substitute ingredients that I have not recommended. [For example, granulated sugar and honey are indeed both sweeteners but they have very different properties so they can not always be swapped 1:1. Using honey in a cookie recipe that calls for granulated sugar will yield a giant mess.] In the recipe card you'll find links to the specific ingredients/brands that I use.
A note on salt: I almost exclusively use Diamond Crystal Kosher Salt because it's the best all-purpose salt for cooking and baking. If you're not using kosher salt, consult this handy guide for a conversion chart! When in doubt, if you're using table salt just reduce the amount by half for baked goods. When cooking, I prefer to under-salt because you can always add more! If you've over-salted, adding a little bit of acid (like lemon juice) can help.
More Recipes You Might Like!
If you love this recipe, please leave a star rating at the bottom of the page! This provides helpful feedback to both me and other readers.
Also be sure to add us as a trusted site on Google so that our recipes show up more in your searches!
For more delicious, scratch-made recipes you can subscribe to my newsletter and follow along on social media!
Recipe Card
Brown Butter Hazelnut Layer Cake
Special Equipment
Ingredients
Hazelnut Praline
- 6 ounces dry roasted hazelnuts, roughly chopped
- 1 cup granulated sugar
- ¼ cup water
- 1-3 tablespoons vegetable oil, optional as needed
Hazelnut Cake
- 2 cups cake flour, substitute all purpose flour
- ½ cup hazelnut flour, substitute almond flour or all purpose flour
- 2 teaspoons baking powder
- ½ teaspoon kosher salt
- 1 cup unsalted brown butter, melted
- 1 cup light brown sugar
- ½ cup granulated sugar
- 3 large eggs, room temperature
- 2 teaspoons vanilla extract
- 1 teaspoon almond extract
- 1 cup whole milk
Brown Butter Buttercream
- 1 ½ cups unsalted brown butter, room temperature
- 4 cups powdered sugar
- 1 teaspoon vanilla extract
- pinch kosher salt
- 2-3 tablespoons heavy cream, as needed
Instructions
- I highly recommend making the cake layers and the brown butter for the buttercream the night before so that they both have time to fully cool!
Hazelnut Praline
- Line a baking sheet with parchment paper and spread the chopped hazelnuts in an even layer. Set aside.
- In a saucepan, combine the sugar and water. Cook over medium heat, stirring occasionally until the sugar has melted and turns a deep amber color.
- Immediately pour the sugar over the hazelnuts and spread into an even layer. Let cool to room temperature.
- Once cool, break into large chunks and set aside about ¼ of the chunks to use to decorate the cake.
- Add the remaining chunks to a food processor and blend for about 5 minutes or until it forms a thick paste about the consistency of peanut butter. Initially it will form a fine powder and then continue to blend until a past forms. If the mixture still isn't forming a paste after blending for a few minutes, add vegetable oil 1 teaspoon at a time until it forms a thick paste.
Cake Layers
- Preheat the oven to 350°F and lightly spray three 6 inch layer cake pans with pan spray.
- Whisk the cake flour, hazelnut flour, baking powder, and salt together in a large bowl.
- In a separate bowl, whisk the brown butter, brown sugar, and granulated sugar together until combined.
- Then add in the eggs, vanilla, and almond extract and mix together until smooth.
- Stir in about half of the flour mixture. Then stir in the milk and the rest of the flour mixture and mix until fully combined. The batter will be thick.
- Pour ⅓ of the batter into each cake pan (they will only be about half full).
- Bake at 350°F for 20-30 minutes or until a cake tester comes out clean.
- Place a cooling rack on top of each cake pan and invert. The pan should slide cleanly away.
- Let the cakes cool completely to room temperature before trimming.
- Once the cakes are fully cooled. Using a sharp bread knife, trim the cakes until the layers are even. Wrap each layer tightly in plastic wrap and place in the freezer overnight (minimum 30 minutes).
Brown Butter Buttercream
- In a stand mixer fitted with the paddle attachment, cream together the softened brown butter and powdered sugar until smooth and creamy.
- Add in the vanilla extract and salt and mix until combined. Then beat the buttercream for 3-4 minutes on high speed until light and fluffy.
- If the buttercream is too thick, add in the cream 1 tablespoon at a time until desired consistency is reached.
Assemble the Cake
- Remove cake layers from the freezer. Place the bottom layer of cake on your cake stand and spread a thin layer of buttercream over the top. Then pipe a thick border of buttercream around the edge. Spoon some of the hazelnut praline paste evenly over the middle (about ¼ cup). Place the next layer on top and repeat.
- Place the final cake layer upside down so that the top of your cake is as even as possible. Spread a thin layer of buttercream (your crumb coat) over the top and sides of the cake. Then place the cake back in the freezer for 30-60 minutes.
- If desired, set aside a small amount of buttercream in a piping back to decorate the top of the cake (a little less than 1 cup is plenty). Evenly smooth the rest of the buttercream on the top and sides of your cake as desired.
- For the mottled look on the sides of the cake, place a few small dollops of leftover praline at random places on the side of the cake, and then smooth into the buttercream.
- Pipe the remaining buttercream around the top edge of the cake (I used a Wilton 1M tip in these photos). Then sprinkle the remaining chunks of praline over top.
Notes
Nutrition
The nutritional information on this website is only an estimate and is provided for convenience and as a courtesy only. The accuracy of the nutritional information for any recipe on this site is not guaranteed.
Charis Merrihew says
I enjoyed the flavor of both the cake and the brown buttercream frosting. I did not try the praline layer, but I added a layer of Nutella, which enhanced the hazelnut flavor nicely. The recipe was also straightforward to follow and the finished cake looked beautiful. The only downside for me was that the cake itself turned out a bit dry and crumbly, but overall the flavor combination was very enjoyable.
Varya says
Hard but so worth it! The end product was very sweet but delicious and got lots of compliments. Personally because of my struggles with the hazelnut praline (burnt the first batch, second batch crystallised, after saving it it was sticky and wouldn't blend properly), I would just remake the cake batter again since it was incredible by itself and pretty simple.
Still worth making this cake since it's so divine but be prepared!
Joanne Mathew says
I love your recipes and have made some a few times. I had a question regarding the Brown Butter Hazelnut Cake. I have coconut flour at home and was wondering if substituting the hazelnut flour with the coconut flour would affect the texture? I've not baked with the coconut flour before but was wondering if you had any experience with it? I don't mind the taste difference with the coconut. My only concern is the cake being moist and soft.
Kyleigh Sage says
Coconut flour does have a different texture, but since the hazelnut flour isn't the bulk of the flour in the recipe, substituting with coconut flour should work great! Coconut flour absorbs more moisture, so I would reduce the amount to 1/4 cup.
Stacey says
I just the made the hazelnut cake recipe part and it’s delicious! It’s light and moist. I did modify mine I did 1/4cup of hazelnut flour and an additional 1/4 cup of cake flour and it was really good! Bake time varied it was usually done by 24-26 minutes.
Laura says
I‘ve made this as a cake as well as cupcakes and it’s been a real hit with people. It’s moist, stacks well and it’s delicious!
I was wondering, do you have any experience with freezing the cake?
Kyleigh Sage says
Yes! I often freeze my cake layers before assembling and frosting. You can tightly wrap the trimmed layers in plastic wrap and then freeze in an airtight container for up to 2 months. Then just frost and assemble while frozen and let come to room temp before serving!
I also often freeze slices of cake after it's made. So wrap individual slices (I like wrap them on paper plates) and then freeze in an airtight container for 1 month. Freezing the whole cake is a little more difficult so I don't recommend it.
Bea says
This cake is so moist & delicious & crunchy, yes it's EVERYTHING you expect from a great recipe & this is it. WOW, WOW, WOW, truly it's that special. If you love hazelnuts, praline a gorgeous light fluffy cake then here's your recipe! Hope you'll try it. It's a winner!😋😋😋
Laura says
I’ve made this as a cake and as cupcakes and both times I received rave reviews. Truly delicious and will definitely be a staple recipe going forward.
I did make a different filling, but next time I’ll try it with the praline.
LJ says
Your recipe was unbelievably delicious!! I DID have to decorate it differently though lol
Mel Nobee says
Made this for my dads birthday a few weeks back and he absolutly adored it! Been obsessed with a new bundt tim so made it in that & baked for 50mins ish & it came out soooo perfect!
The texture was my favourite part, it was perfect for me. Everyone loved it , specially my dad. Browning the butter really does add that bit extra.
Lovely recipe! Thank you Kyleigh x