

These slice & bake espresso chocolate chunk cookies are soft with crispy edges and a ton of coffee flavor! Perfect for when you want a cookie to go with your morning coffee!

You might also like these espresso brownies or these espresso macarons!
Jump to:
Ingredient Notes
You just need a few ingredients to make these espresso chocolate chunk cookies!

Brown Butter - My favorite ingredient of all time is brown butter!! Brown butter is just unsalted butter that has been melted and gently cooked to bring out a toasty, nutty flavor. Best of all, brown butter pairs beautifully with the dark chocolate and espresso. If you've never made brown butter before, you can check out this post with all my tips for how to make brown butter!
Espresso Powder - You can't have espresso slice & bake cookies without espresso powder! King Arthur is my favorite brand of high quality espresso powder! Note: espresso powder is NOT the same as instant espresso!! Espresso powder is much more flavorful and more finely ground, making it more suitable for baking.
Dark Chocolate - I like chopping up dark chocolate baking bars to make chocolate chunks for these cookies, but you can just use chocolate chips instead.
Flaky Sea Salt - There's nothing better than a little sprinkle of flaky sea salt on top of warm chocolate chunk cookies!
The complete list of ingredients and amounts is located in the recipe card below.
How to Make Slice & Bake Cookies
Browning the butter is technically optional but the extra time is SO worth it! The biggest problem I see people run into when using brown butter in cookies, is not letting the butter cool completely to room temperature before adding it to the dough. So I highly recommend browning the butter the night before you want to make these espresso cookies.
Roughly chop the dark chocolate into chunks and set aside.

Using a stand or hand mixer, cream together the brown butter, brown sugar, and granulated sugar until smooth and creamy.
Add in the egg and vanilla extract and beat until the texture is light and fluffy (about 3-5 minutes, it should look much paler than before).
Stir in the flour, espresso powder, baking powder, and salt and mix until thoroughly combined.


Using a spoon or spatula, gently fold in the dark chocolate chunks.


Roll the dough out into a 15 inch log and wrap tightly with plastic wrap. Place in the fridge to chill overnight, (but a minimum of 2 hours). The dough will keep in the fridge for up to 2 days before slicing.

Preheat your oven to 350°F and line a light colored baking sheet with parchment paper.
Remove the dough from the fridge and slice into disks between ¼ and ½ inch thick.
Note: If you don't want to make slice & bake cookies, you can just roll out the dough into a ½ inch thick sheet and use cookie cutters instead!
Place the cookies 2 inches apart on the lined baking sheet (you should be able to bake 8-10 at a time).

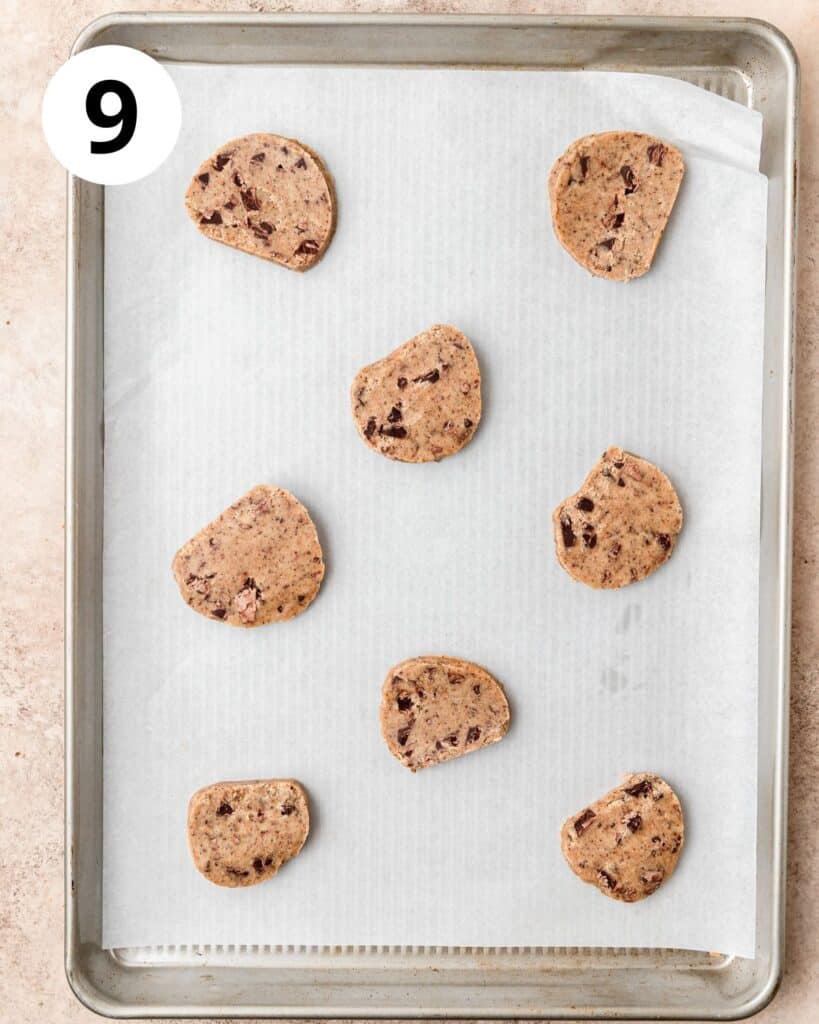
Bake the espresso chocolate chunk cookies at 350°F for about 15 minutes or until the edges are set and the centers are still soft.
Remove from the oven and let rest on the baking sheet for 1-2 minutes, then transfer to a cooling rack.
If desired, sprinkle with flaky sea salt and enjoy!

Tips for Perfect Cookies
Measure your flour correctly! It's most accurate to use a kitchen scale, but if you're measuring by volume you want to spoon and level! Fluff up the flour a bit with a spoon, and then spoon flour into the measuring cup. Once it's overflowing, use the back of a knife to level it off. Don't ever pack flour into the measuring cup or you'll end up with way too much! Improperly measured flour can lead to dry, crumbly cookies that don't spread.
Make sure your oven is the proper temperature! Use an oven thermometer to make sure your oven is exactly 350°F. If the oven is too cold, the cookies will spread too much and if it's too hot they centers won't bake all the way through. For example, my oven is about 20 degrees off. So I have to set the oven to 370°F in order to get it to bake at 350°F.
Use a lightweight, light colored baking sheet for best results! Believe it or not, a lighter pan makes the cookies bake more slowly than a dark pan, which helps keep them from spreading too much. My favorite pans for baking cookies are:
You also want to use either parchment paper or silicone mats on your cookie sheet to help keep the cookies from spreading.
Bake the cookies one sheet at a time, on the center rack. This will ensure all your cookies cook evenly and the bottoms don't burn. Then let the cookie sheet cool completely between batches. This ensures the cookies cook evenly and don't spread too much by being put on a hot pan.
Always under-bake the cookies! If you slightly under-bake the cookies (so the centers are still soft when you remove them from the oven), they'll stay soft and chewy for days!
Do the cookie scoot! In order to get perfectly round cookies, use a large cookie cutter to gently scoot them around as soon as they come out of the oven!
Cookie Baking Tools

Recipe FAQ's
Store the baked espresso chocolate chunk cookies in an airtight container at room temperature for up to 4 days.
Chilling the cookie dough allows the flour to hydrate a bit and ensures the butter is super cold. This keeps your slice & bake cookies from spreading too much and completely flattening out. It also ensures the cookies keep their shape.
No! You can regular unsalted butter if you prefer! I just love the way the brown butter pairs with the espresso powder.
Technically yes, but I don't recommend it. Instant coffee isn't as strong as espresso powder and it also typically has a harsher flavor that won't taste as good in the slice & bake cookies.

Tips for Success!
For best results I always recommend using weight measurements (especially when baking) because it's the most accurate. Kitchen scales are super affordable and also reduce the number of dishes you have to do! However, all my recipes also include US customary measurements for convince. Use this chart to convert measurements for common ingredients!
Substitutions: In all my recipes, I've included substitutions that I know will work, but I cannot guarantee results if you substitute ingredients that I have not recommended. [For example, granulated sugar and honey are indeed both sweeteners but they have very different properties so they can not always be swapped 1:1. Using honey in a cookie recipe that calls for granulated sugar will yield a giant mess.] In the recipe card you'll find links to the specific ingredients/brands that I use.
A note on salt: I almost exclusively use Diamond Crystal Kosher Salt because it's the best all-purpose salt for cooking and baking. If you're not using kosher salt, consult this handy guide for a conversion chart! When in doubt, if you're using table salt just reduce the amount by half for baked goods. When cooking, I prefer to under-salt because you can always add more! If you've over-salted, adding a little bit of acid (like lemon juice) can help.
More Cookie Recipes You Might Like!


If you love this recipe, please leave a star rating at the bottom of the page! This provides helpful feedback to both me and other readers.
Also be sure to add us as a trusted site on Google so that our recipes show up more in your searches!
For more delicious, scratch-made recipes you can subscribe to my newsletter and follow along on social media!
Recipe Card

Slice & Bake Espresso Chocolate Chunk Cookies
Special Equipment
Ingredients
- 1 cup unsalted brown butter, room temperature
- ½ cup light brown sugar
- ¼ cup granulated sugar
- 1 large egg, room temperature
- 1 teaspoon vanilla extract
- 2 cups all purpose flour
- 2 teaspoons espresso powder
- ½ teaspoon baking powder
- ½ teaspoon kosher salt
- 1 cup dark chocolate, roughly chopped
- flaky sea salt, optional
Instructions
- Roughly chop the dark chocolate into chunks and set aside.
- Using a stand or hand mixer, cream together the brown butter, brown sugar, and granulated sugar until smooth and creamy.
- Add in the egg and vanilla extract and beat until the texture is light and fluffy (about 3-5 minutes, it should look much paler than before).
- Stir in the flour, espresso powder, baking powder, and salt and mix until thoroughly combined.
- Using a spoon or spatula, gently fold in the dark chocolate chunks.
- Roll the dough out into a 15 inch log and wrap tightly with plastic wrap. Place in the fridge to chill overnight, (but a minimum of 2 hours). The dough will keep in the fridge for up to 2 days before slicing.
- Preheat your oven to 350°F and line a light colored baking sheet with parchment paper.
- Remove the dough from the fridge and slice into disks between ¼ and ½ inch thick. Note: If you don't want to make slice & bake cookies, you can just roll out the dough into a ½ inch thick sheet and use cookie cutters instead!
- Place the cookies 2 inches apart on the lined baking sheet (you should be able to bake 8-10 at a time).
- Bake the espresso chocolate chunk cookies at 350°F for about 15 minutes or until the edges are set and the centers are still soft.
- Remove from the oven and let rest on the baking sheet for 1-2 minutes, then transfer to a cooling rack.
- If desired, sprinkle with flaky sea salt and enjoy!
- Store cookies in an airtight container at room temperature for up to 4 days.
Notes
Nutrition
The nutritional information on this website is only an estimate and is provided for convenience and as a courtesy only. The accuracy of the nutritional information for any recipe on this site is not guaranteed.
Anonymous says
Letting them chill for too long may leave them in the same shape they were cut, so let the dough thaw a little before cutting so that they flatten out a bit more