

I love living in South Carolina, but there is a severe lack of Italian bakeries around here! So I've learned that if I want good cannoli, you have to make them yourself! This traditional homemade cannoli recipe has crispy fried shell and is filled with a creamy whipped ricotta filling!

Jump to:
What are Cannoli?
Cannoli are a traditional Italian pastry from of island of Sicily that have become super popular in Italian-American cuisine (specifically the Northeast US). Cannoli are tubes of deep fried dough filled with a slightly sweet, ricotta cheese filling.
In Italian, the singular is cannolo, and the plural is cannoli, but often in English people will say cannoli's for the plural.
I love cannoli because they aren't overly sweet (aka it's easy like 5 in one sitting).
The best thing about homemade cannoli is that they're super versatile, so you can have whatever flavor combo you want!
Ingredient Notes
Most of the ingredients you need to make cannoli are pantry staples you likely already have at home!

The two special ingredients you need are:
Marsala Wine - Cannoli dough is traditionally made with marsala, but you can substitute any dry white wine (like sherry).
Whole Milk Ricotta Cheese - The creamy ricotta filling is what makes cannoli so good! Whole milk ricotta has the best flavor and typically isn't as watery as skim varieties. But even whole milk ricotta needs to be strained so that you don't end up with soggy cannoli. You can also swap out the ricotta for mascarpone cheese!
The complete list of ingredients and amounts is located in the recipe card below.
Flavor Variations
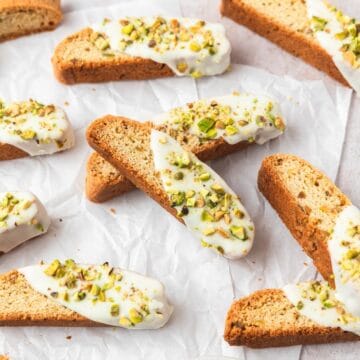
For these cannoli, I did a plain ricotta filling and just added different toppings on top. But the toppings are even better mixed in!
Some classic flavors are:
- Mini chocolate chips
- Chopped hazelnuts
- Chopped pistachios
- Cinnamon or pumpkin spice
- Candied fruit (candied orange peel is a popular choice)
- Espresso (add 1 tablespoon of espresso powder to the filling)
- Chocolate cannoli shell (add 1 tablespoon of unsweetened cocoa powder to the dough for the cannoli shells)
- Chocolate dipped cannoli shells
How to Strain Ricotta
Since ricotta contains a lot of water, it needs to be strained before whipping. You'll need:
- Medium sized bowl
- Strainer
- Cheesecloth
Place a strainer over a bowl and then lay a cheesecloth inside the strainer. Gently spread the ricotta into an even layer. Loosely cover the bowl with plastic wrap, and chill in the refrigerator. Let the ricotta cheese strain overnight (at least 8-12 hours).


Special Tools
You need a few special tools to make cannoli at home!

How to Make Homemade Cannoli
The dough is super easy and comes together quickly in a food processor!
Add the flour, sugar, and salt to the food processor and pulse until just combined. Then add in the cold butter and pulse until you have small crumbles. You can also make the dough by hand the same way you would make pie crust.


Add the whole egg, egg yolk, and marsala and pulse until the dough comes together into a shaggy ball.
Turn the dough out onto a clean surface and knead for 2-4 minutes until you have a smooth ball. Place the dough in a lightly oiled bowl, cover, and rest for 1 hour.


While the dough is resting, add about 2 inches of vegetable oil to a large pot or Dutch oven over medium heat until it reaches 350°F.
Roll out the dough as thin as possible (⅛th to 1/16th inch thick) and use a 4 inch cookie cutter to cut into rounds. For mini cannoli use a 2 inch cookie cutter.
Lightly brush the cannoli forms with vegetable oil and then wrap the cannoli dough around each form. Brush the edge where the ends meet with egg white and press gently to seal.


Fry the shells at 350°F for about 1 minute on each side until golden brown and crispy. Only fry 4-5 at a time so as not to crowd the pan.
Use tongs to transfer the cannoli to a paper towel to drain. Immediately remove the form from the cannoli (you can use the tongs and a paper towel to gently wiggle it off the form, just be careful!).


Let the forms cool fully and repeat the process with the remaining dough circles. Let the cannoli shells cool fully before filling.
While the cannoli are cooling, make the filling.
Stir your desired toppings into the ricotta filling and pipe into the cannoli shells.

Or leave the filling plain and let people choose their own toppings!
Dust with powdered sugar if desired.

Recipe FAQ's
Yes! You can buy Cannoli shells at some specialty stores or online.
As soon as the cannoli are filled they will start to soften, so they're best eaten within 1-2 hours of filling. However, you can store the filling and shells separately to keep them fresh longer!
You can store fried cannoli shells in an airtight container at room temperature for up to 2 days. Store in the filling in the fridge.
Yes!! I know it's an extra step, but it's what will keep your cannoli from getting soggy!
Tips for Success!
For best results I always recommend using weight measurements (especially when baking) because it's the most accurate. Kitchen scales are super affordable and also reduce the number of dishes you have to do! However, all my recipes also include US customary measurements for convince. Use this chart to convert measurements for common ingredients!
Substitutions: In all my recipes, I've included substitutions that I know will work, but I cannot guarantee results if you substitute ingredients that I have not recommended. [For example, granulated sugar and honey are indeed both sweeteners but they have very different properties so they can not always be swapped 1:1. Using honey in a cookie recipe that calls for granulated sugar will yield a giant mess.] In the recipe card you'll find links to the specific ingredients/brands that I use.
A note on salt: I almost exclusively use Diamond Crystal Kosher Salt because it's the best all-purpose salt for cooking and baking. If you're not using kosher salt, consult this handy guide for a conversion chart! When in doubt, if you're using table salt just reduce the amount by half for baked goods. When cooking, I prefer to under-salt because you can always add more! If you've over-salted, adding a little bit of acid (like lemon juice) can help.
More Recipes You Might Like


If you love this recipe, please leave a star rating at the bottom of the page! This provides helpful feedback to both me and other readers.
Also be sure to add us as a trusted site on Google so that our recipes show up more in your searches!
For more delicious, scratch-made recipes you can subscribe to my newsletter and follow along on social media!
Recipe Card

Homemade Cannoli
Special Equipment
Ingredients
Cannoli
- 2 cups all purpose flour
- 2 tablespoons granulated sugar
- 3 tablespoons unsalted butter
- ¼ teaspoon kosher salt
- ⅓ cup marsala wine
- 1 large egg
- 1 egg yolk, set aside egg white for brushing
Filling
- 16 ounces ricotta cheese, strained
- ½ cup powdered sugar
- 1 teaspoon vanilla extract
Instructions
- Add the flour, sugar, and salt to the food processor and pulse until just combined. Then add in the cold butter and pulse until you have small crumbles. You can also make the dough by hand the same way you would make pie crust.
- Add the whole egg, egg yolk, and marsala and pulse until the dough comes together into a shaggy ball.
- Turn the dough out onto a clean surface and knead for 2-4 minutes until you have a smooth ball. Place the dough in a lightly oiled bowl, cover, and rest for 1 hour.
- While the dough is resting, add about 2 inches of vegetable oil to a large pot or Dutch oven over medium heat until it reaches 350°F.
- Roll out the dough as thin as possible (⅛th to 1/16th inch thick) and use a 4 inch cookie cutter to cut into rounds. For mini cannoli use a 2 inch cookie cutter.
- Lightly brush the cannoli forms with vegetable oil and then wrap the cannoli dough around each form. Brush the edge where the ends meet with egg white and press gently to seal.
- Fry the shells at 350°F for about 1 minute on each side until golden brown and crispy. Only fry 4-5 at a time so as not to crowd the pan.
- Use tongs to transfer the cannoli to a paper towel to drain. Immediately remove the form from the cannoli (you can use the tongs and a paper towel to gently wiggle it off the form, just be careful!).
- Let the forms cool fully and repeat the process with the remaining dough circles. Let the cannoli shells cool fully before filling.
- While the cannoli are cooling, make the filling.
- Add the strained ricotta, powdered sugar, and vanilla to a large bowl. Using a hand mixer, whip the ricotta until it's fully combined and smooth. If desired, fold in chopped nuts or chocolate chips!
- When ready to use transfer to a piping bag, snip the tip off and fill the shells. Then press on desired toppings!
Notes
Nutrition
The nutritional information on this website is only an estimate and is provided for convenience and as a courtesy only. The accuracy of the nutritional information for any recipe on this site is not guaranteed.
Danae says
Do you have to use a food processor? Can you use a kitchen aid instead? Thank you!
Kyleigh Sage says
You don't have to use a food processor, it just makes it a little easier. You can use a large mixer like a kitchen aid or just mix and knead by hand!
Hailey says
If I were to make the pumpkin spice variation you mentioned, how much do you think I should add?
Kyleigh Sage says
I would add 1/2 teaspoon to 1 teaspoon of pumpkin pie spice to the cannoli shells (depending on how strong you want the flavor). And then at least 1 teaspoon (or more to taste) of pumpkin pie spice to the ricotta filling! You could also mix in 1/4 cup of strained pumpkin puree to the ricotta!
Shelby says
These cannolis taste amazing! Made these on a whim and dished them out to a bunch of family members and got nothing but praise. Definitely going to be a sweets staple moving forward!
One question though, frying the shells created a bit of a mess I just do not feel like creating and cleaning regularly. Any tips on possibly baking or air frying the shells?
Kyleigh Sage says
I've never tried baking or air frying them. I worry it wouldn't work well because typically deep fried doughs just don't cook/puff up properly using other methods. Of the two, the air fryer would probably work better though? If you end up trying it, I'm definitely curious to hear how it turns out!
Catherine says
This recipe is easy and delicous
Millie says
Can I make the shells the day before,and keep them in an airtight container and fill tomorrow?
Kyleigh Sage says
Yes! Make sure they cool completely before storing and store them at room temp and they should stay crisp for a couple days before filling!
Lynn says
Came out great! Delicious my company enjoyed these. Simple to make. I need to perfect straining the ricotta cheese is was a wee bit liquidy.
Catherine says
my dough had a little elasticity, any suggestions for this?
Kyleigh Sage says
Letting it rest at room temperature for a little longer can help it relax more! You can also roll the circles as much as you can, then let them rest for at least 10 minutes and then roll them again and it should be easier then!
Becky says
These were delish! I didn’t have time to make homemade shells this time so I bought some premade. The filling was creamy and sweet! I added orange zest which was a nice touch of flavor. I dipped half in mini chocolate chips and half in chopped pistachios. Will definitely make again!
Robyn Durant says
The filling is really grainy and consistency seems a little thin.
What did I do wrong?
Kyleigh Sage says
Certain brands of ricotta can be naturally more watery/grainy than others, but this usually happens if the ricotta hasn’t been drained enough and has too much water.
To fix it, you can try to drain any excess water, then whip it again with a couple tablespoons of heavy cream and a little more powdered sugar. Also adding in a little bit of mascarpone or cream cheese can help.
Another tip I’ve never personally tried is to take 1/2 cup heavy cream and 2 tablespoons of powdered sugar and make whipped cream, then gently fold that into the ricotta mixture.
Robyn Durant says
Thank you! I think between the brand and not straining it enough was the issue! I’ll follow your advice and cross my fingers! 🤞😊
mike says
Hey Robyn.. I've learned after much ricotta trial and (mostly) error that sometimes it helps to press the ricotta through a fine mesh sieve/strainer with a spoon before mixing with your hand mixer... some brands are ricotta mostly in name only and need a little extra work to make it palatable!!!
Robyn Durant says
Excited to make these cannolis! Could I make the dough and filling the day before and fry and fill the day I need them?
Kyleigh Sage says
Yes! After the dough is finished rising, keep it in the fridge overnight. You might need to let it warm up a little bit before rolling out the next day.
Nancy says
Hoping to try these over Christmas. Can you share the size of piping tip?
Thanks
Kyleigh Sage says
It doesn’t really matter, just use the largest one you have! I have a set of XL tips and I usually go for the 9FT
Marta says
Wonderful recipe! Easy to follow. The result was amazingly delicious. Thank you!
Aleah says
Can I let the dough sit in the fridge for like 2-3 nights Before using?
Kyleigh Sage says
1-2 days in the fridge should be fine. Just be sure to let it rest at room temperature for about 30 minutes before rolling it out.
George Hartford says
Can you tell approximately how many cannolis this recipe makes
Kyleigh Sage says
It makes roughly 18 regular sized cannoli!
Hannah Semple says
Can I make without alcohol?
Kyleigh Sage says
Yes! It will change the flavor of the shells slightly, but you can just use water instead.
Layla says
These turned out so good! The shells were so crisp!
Julia says
Hi! Can I make the dough the night before and refrigerate it?
Kyleigh Sage says
Yes absolutely! But you’ll probably want to let it come up to room temp for 30 mins or so before trying to roll it out.
Tamara says
delicious and easy to make!